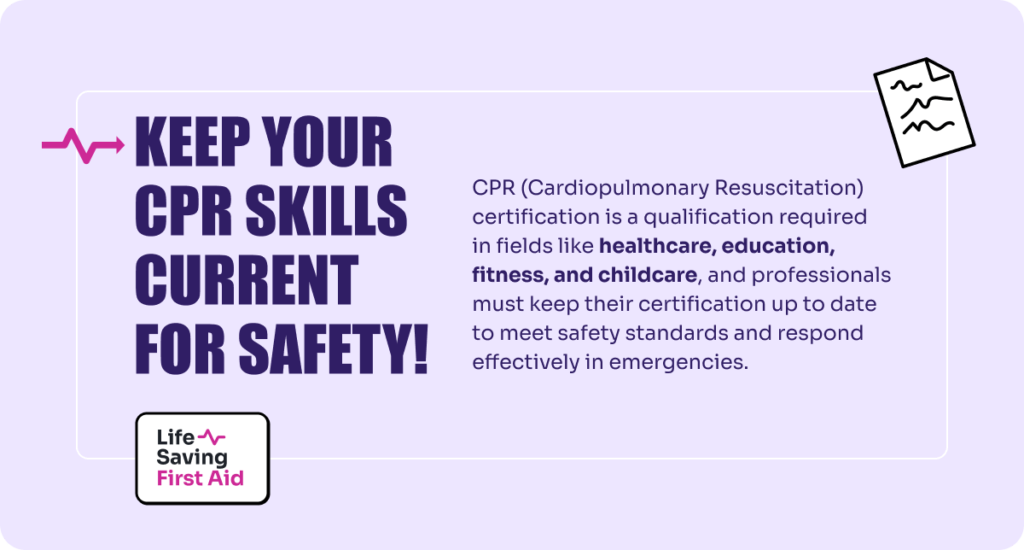
CPR (Cardiopulmonary Resuscitation) certification is a qualification earned through training that teaches individuals how to perform essential life-saving techniques in emergencies, such as when someone’s heart or breathing stops. This certification is often required in various professional settings, particularly in fields like healthcare, education, fitness, and childcare, where the safety of others is a priority. For professionals such as teachers, fitness trainers, and childcare workers, maintaining an up-to-date CPR certification is crucial for meeting safety standards and ensuring they can respond to emergencies with confidence.
Beyond its importance in the workplace, CPR certification is also highly beneficial in personal settings. Having the skills and knowledge to perform CPR can make a vital difference in critical moments, whether you’re at home, in public, or with loved ones. Knowing how to respond swiftly and effectively in life-threatening situations gives peace of mind and could potentially save lives. Whether for professional advancement or personal preparedness, CPR certification is a vital skill that everyone should consider acquiring.
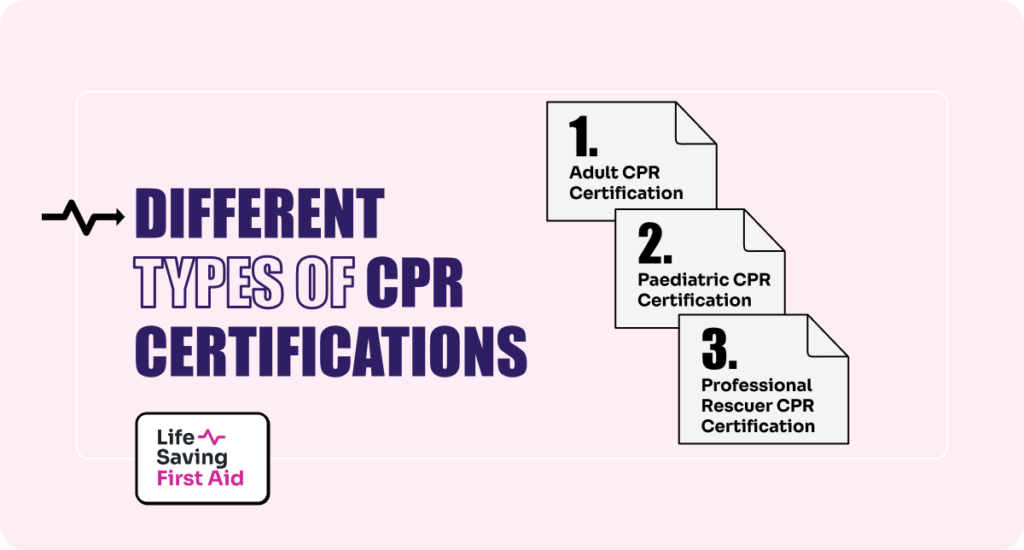
Different Types of CPR Certifications
There are several types of CPR certifications available, each tailored to specific situations and populations. Understanding the differences between these certifications helps individuals choose the appropriate training for their needs, whether personal or professional.
Adult CPR Certification
This type of certification focuses on teaching CPR techniques specific to adults and is typically recommended for the general public. It covers how to perform chest compressions, use of an Automated External Defibrillator (AED), and how to provide rescue breaths. Adult CPR certification is useful for those who may encounter cardiac emergencies involving adults, whether at home, work, or in public spaces.
Paediatric CPR Certification
Paediatric CPR training is designed to address the unique needs of infants and children during emergencies. The anatomy and response of a child or infant to CPR differ from that of an adult, so this certification focuses on the correct techniques for younger age groups. It’s especially beneficial for parents, caregivers, educators, and childcare professionals who work with children regularly.
Professional Rescuer CPR Certification
This advanced level of CPR certification is geared toward healthcare providers, first responders, and other professionals who may need to respond to a variety of emergencies. Professional Rescuer CPR includes more detailed and comprehensive training, such as two-person CPR techniques, handling airway obstructions, and using specialised medical equipment like bag valve masks. It’s typically required for medical professionals, paramedics, lifeguards, and other high-stakes emergency roles.
Choosing the Right CPR Certification for Your Needs
Selecting the right CPR certification depends on your profession, personal needs, and the type of people you may need to assist in emergencies. Here’s a guide to help you choose the most suitable certification:
General Public
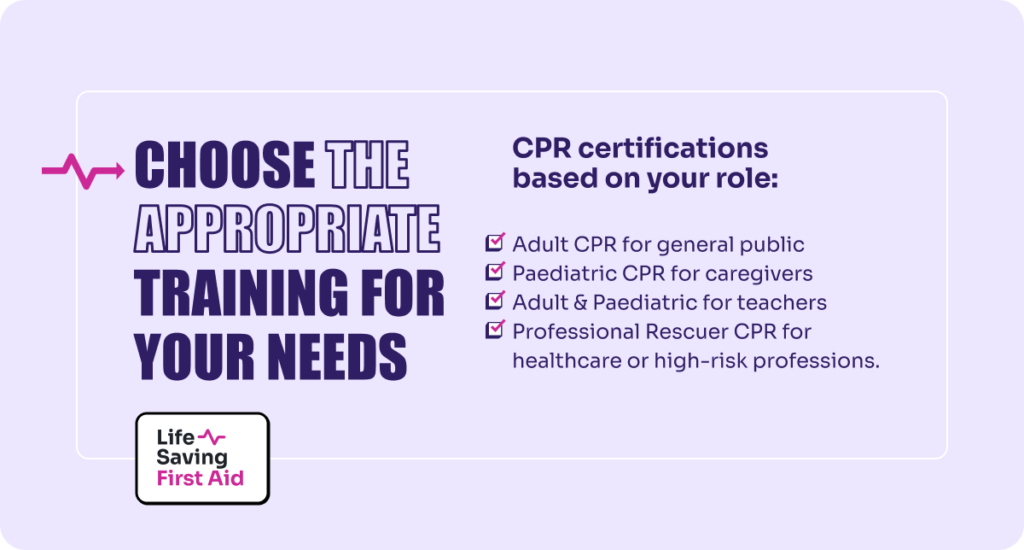
If you’re looking to be prepared for emergencies at home or in public, an Adult CPR Certification is a great starting point. This training will equip you with the knowledge to help someone over the age of 12 who suffers from a cardiac emergency. It’s ideal for individuals who want to be prepared for everyday situations or be a responsible family member, friend, or bystander.
Parents, Caregivers, and Childcare Professionals
If you care for infants or young children, such as being a parent, babysitter, or daycare worker, a Paediatric CPR Certification is essential. This certification covers techniques specific to infants (under 1 year old) and children (ages 1-12), ensuring you’re ready to assist in emergencies like choking, drowning, or cardiac arrest that are more common among younger age groups.
Teachers, Coaches, and Fitness Instructors
For individuals working in schools, sports, or fitness settings, Adult & Paediatric CPR Certification offers a comprehensive solution. Since you’re interacting with both adults and children, it’s important to be prepared for emergencies involving all age groups. This certification is also often required for employment in these fields, demonstrating a commitment to safety.
Healthcare Workers, Lifeguards, Coaches, and Other High-Risk Professions
For those working in healthcare, emergency services, or high-risk professions like lifeguarding, coaching, or industrial work, a Professional Rescuer CPR Certification is typically required. This certification provides advanced training that goes beyond basic CPR, covering two-person rescue techniques, handling airway obstructions, and using medical equipment such as bag valve masks. It’s ideal for individuals who may face complex emergencies and need to be ready for high-stakes situations. Whether you’re a paramedic, nurse, lifeguard, or coach, this certification ensures you’re prepared to respond effectively in critical, potentially life-threatening scenarios.
Finding the Right CPR Training Course
When searching for the right CPR training course, it’s important to consider your schedule, learning preferences, and certification requirements. Here are some insights to help you locate suitable CPR training options, whether in-person or online:
- In-Person CPR Classes
In-person courses offer hands-on training with live instruction, making them ideal for those seeking real-time feedback while practicing techniques like chest compressions and using an AED (Automated External Defibrillator). These courses are especially beneficial for individuals who need practical experience or are required to meet certification standards that mandate in-person evaluation. - Online CPR Classes
Online CPR training offers a flexible solution for individuals with busy schedules. Many programs provide fully online courses or hybrid options, covering the theoretical aspects of CPR through video demonstrations and quizzes. However, some certification pathways may also require an in-person skills assessment to ensure practical competency. - Blended Learning Options
Blended learning is an ideal solution for those seeking flexibility without sacrificing hands-on practice. This option combines online learning for the theory portion with an in-person component for practicing CPR skills. You can study at your own pace online, then attend a scheduled session for practical training, ensuring you receive a comprehensive learning experience.
The CPR Certification Process
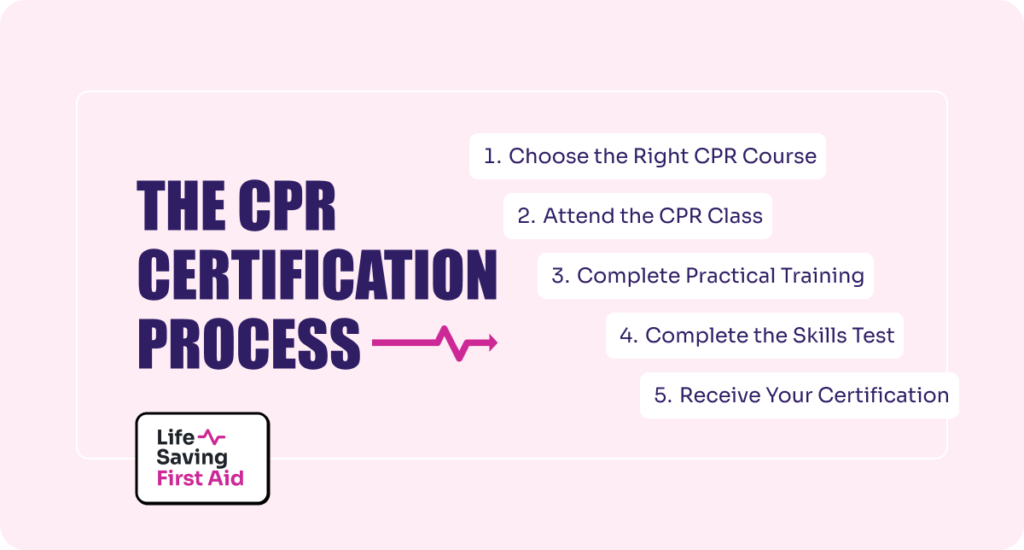
The process of obtaining CPR certification is straightforward and typically involves several key steps to ensure that you have both the knowledge and practical skills needed to respond effectively in an emergency. Here’s an outline of the typical certification process:
1. Choosing the Right CPR Course
The first step is selecting a course that suits your needs. Whether you need Adult CPR, Child CPR, or a more advanced Professional Rescuer CPR, it’s important to choose the right type of training. At Life Saving First Aid, we offer a variety of CPR certification options to fit different personal or professional requirements, including in-person, online, and blended learning.
2. Attending CPR Class
Once you’ve selected the appropriate course, the next step is attending the instructional sessions. If you’ve chosen an in-person course, you will receive face-to-face guidance from certified instructors. Online or blended learning courses allow you to complete the theoretical portion at your own pace, covering topics such as the steps of CPR, recognising cardiac emergencies, and proper use of an AED (Automated External Defibrillator).
3. Practical Training
In-person or blended courses require hands-on practice, usually performed with CPR mannequins. This phase allows you to:
- Practice chest compressions and rescue breaths
- Learn the proper use of an AED
- Respond to real-life scenarios such as choking or cardiac arrest
In blended learning, after completing the online theory, you will attend a practical skills session where an instructor assesses your ability to apply the techniques you’ve learned.
4. Skills Assessment
To obtain certification, you must pass a practical skills assessment. This assessment ensures that you are able to:
- Perform high-quality chest compressions
- Deliver rescue breaths correctly
- Use an AED effectively in a timely manner
During this stage, the instructor will observe and evaluate your performance, providing corrections or guidance if needed. For those taking online-only courses, a follow-up in-person skills test may be required to complete certification.
5. Receiving Your Certification
Once you’ve successfully completed the course and practical assessment, you will receive your CPR certification. At Life Saving First Aid, we provide certification cards that are recognised by employers and meet industry standards. CPR certifications are valid for one year, after which a CPR Refresher is required to maintain your qualification.
Preparing for the CPR Certification Test
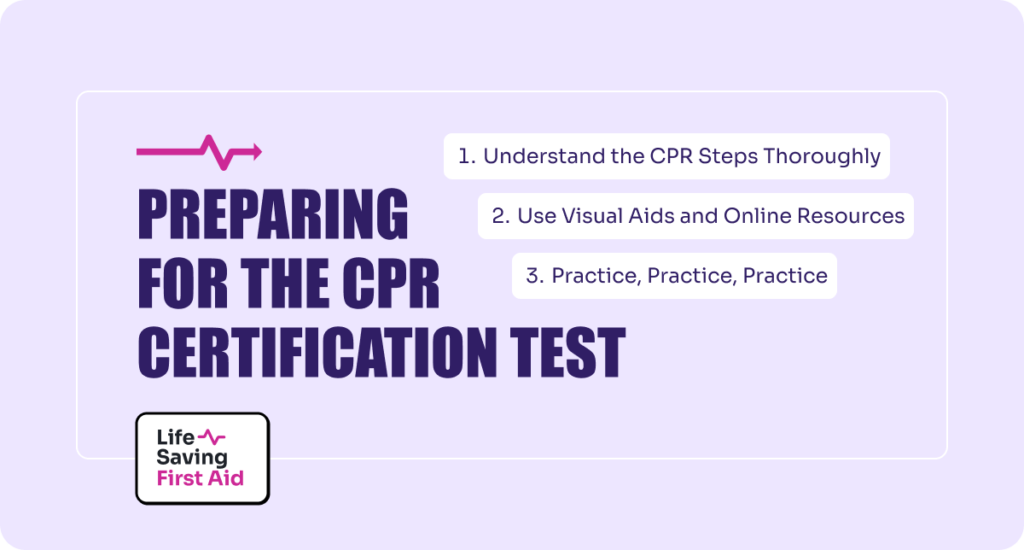
Preparing for your CPR certification test involves both practical and theoretical knowledge. Whether you’re new to CPR or renewing your certification, these tips will help you feel confident and prepared for both components of the test.
1. Understand the CPR Steps Thoroughly
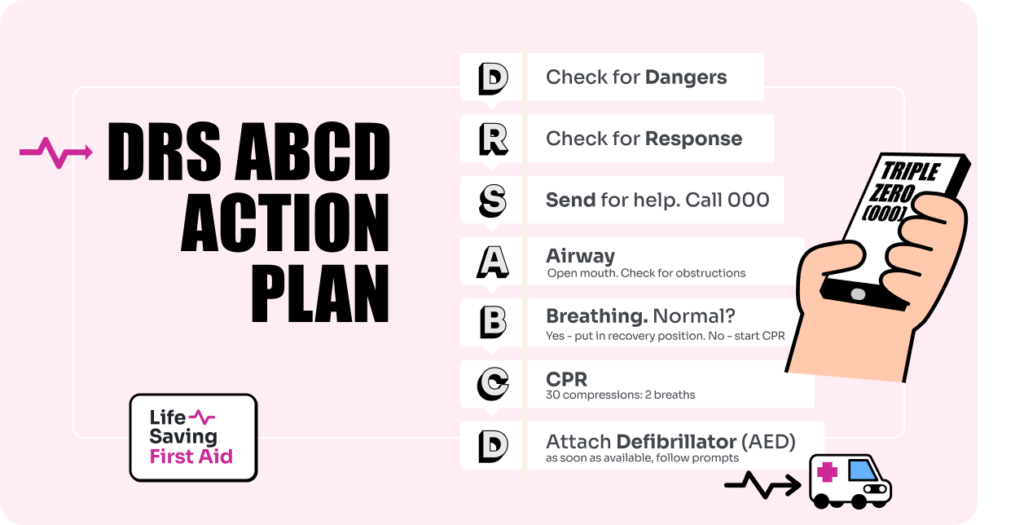
Theoretical knowledge forms the foundation of your CPR skills, so it’s important to fully understand the steps involved in performing CPR. These include:
- Checking the scene for safety
- Assessing the victim’s responsiveness and breathing
- Performing chest compressions and rescue breaths
- Using an AED (Automated External Defibrillator)
Familiarise yourself with the sequence and the purpose behind each step. Many courses provide materials like manuals or online modules—review these before your test.
2. Use Visual Aids and Online Resources
There are many online videos and tutorials that demonstrate proper CPR techniques. These resources can help reinforce what you learn in class. Watching others perform the steps properly can help you visualise what you need to do and give you confidence during your practical assessment.
3. Practice, Practice, Practice
The practical component of the CPR test is hands-on, so getting as much practice as possible is crucial. If you’re in an in-person or blended course, take advantage of the practice sessions with mannequins provided during the course. Focus on:
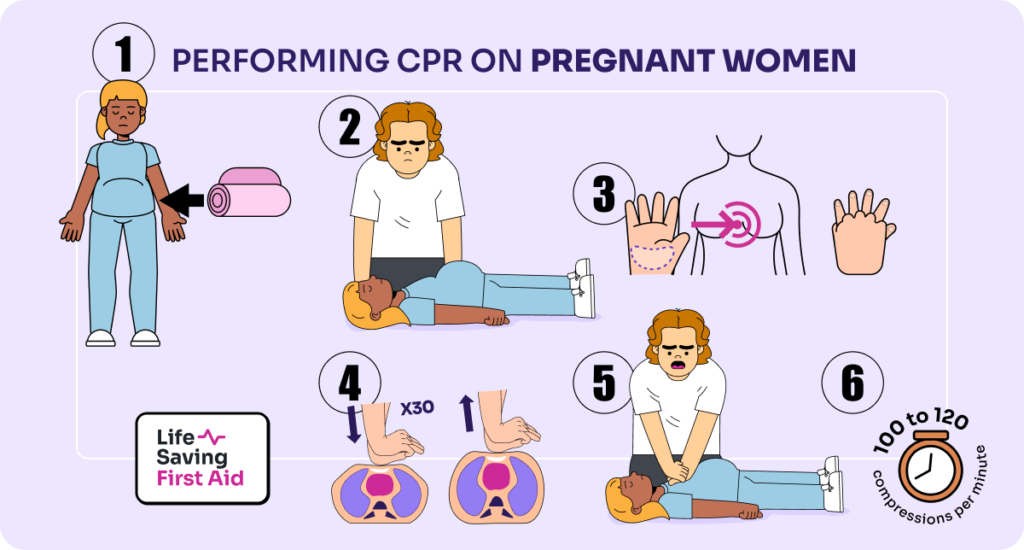
- Chest compressions: Ensure you’re pressing hard and fast enough (about 5-6 cm deep at a rate of 100-120 compressions per minute).
- Rescue breaths: Practice sealing your mouth over the mannequin’s and delivering breaths without over-inflating the chest.
- Using an AED: Familiarise yourself with the device so that you’re comfortable following its prompts during an emergency.
Maintaining and Renewing Your CPR Certification
In Australia, the decision that CPR certificates expire (typically after 12 months) is largely based on recommendations from key health and safety organisations such as the Australian Resuscitation Council and Australian Skills Quality Authority (ASQA). Maintaining and renewing your CPR certification is essential to ensure you’re up to date with the latest techniques and ready to respond in emergencies. To stay certified in CPR the course needs to be renewed every year.
The recertification process usually involves enrolling in a blended learning course that combines online theory with an in-person practical session. At Life Saving First Aid, we Offer blended learning options, allowing you to complete the theoretical portion at your own pace and then attend an in-person session to practice and demonstrate your skills under the guidance of certified instructors.
For professionals in healthcare, education, or other high-risk fields, maintaining a valid CPR certification is often a legal or job-related requirement. Regular recertification ensures you’re aware of any updates to CPR guidelines and can continue to provide effective life-saving care.
Benefits of Being CPR Certified
Becoming CPR certified offers significant personal and professional benefits, equipping you with the skills to respond effectively in emergencies. The most crucial advantage is the ability to save lives; knowing how to perform CPR and use an AED can mean the difference between life and death in a cardiac emergency.
Additionally, CPR certification boosts your confidence, allowing you to act decisively under pressure, whether it’s for a family member, colleague, or stranger. For many professions—such as healthcare, teaching, and childcare—CPR certification is often a requirement, enhancing your resume and demonstrating a commitment to safety.
Moreover, CPR training increases your overall awareness of health and safety, making you a valuable asset in various environments. By being CPR certified, you also contribute to community safety, knowing you can provide immediate assistance in emergencies. These benefits make CPR certification a worthwhile investment, empowering you with life-saving skills and the confidence to act when it matters most.
Start Your Journey to Becoming CPR Certified
Ready to make a difference and be prepared for emergencies? Enrolling in a CPR course is a vital step in equipping yourself with the skills to save lives. Whether for personal development or professional requirements, CPR certification empowers you with the confidence and knowledge to respond effectively in critical situations.
At Life Saving First Aid, we offer blended learning options that combine convenient online theory with hands-on practical training, ensuring you gain the necessary skills and confidence to act in emergencies. Don’t wait until it’s too late—take the proactive step to protect yourself and those around you.
Join us at Life Saving First Aid and become a certified lifesaver today! Visit our website to learn more and sign up for a course that fits your schedule.
Your journey to making a positive impact
starts now!!!