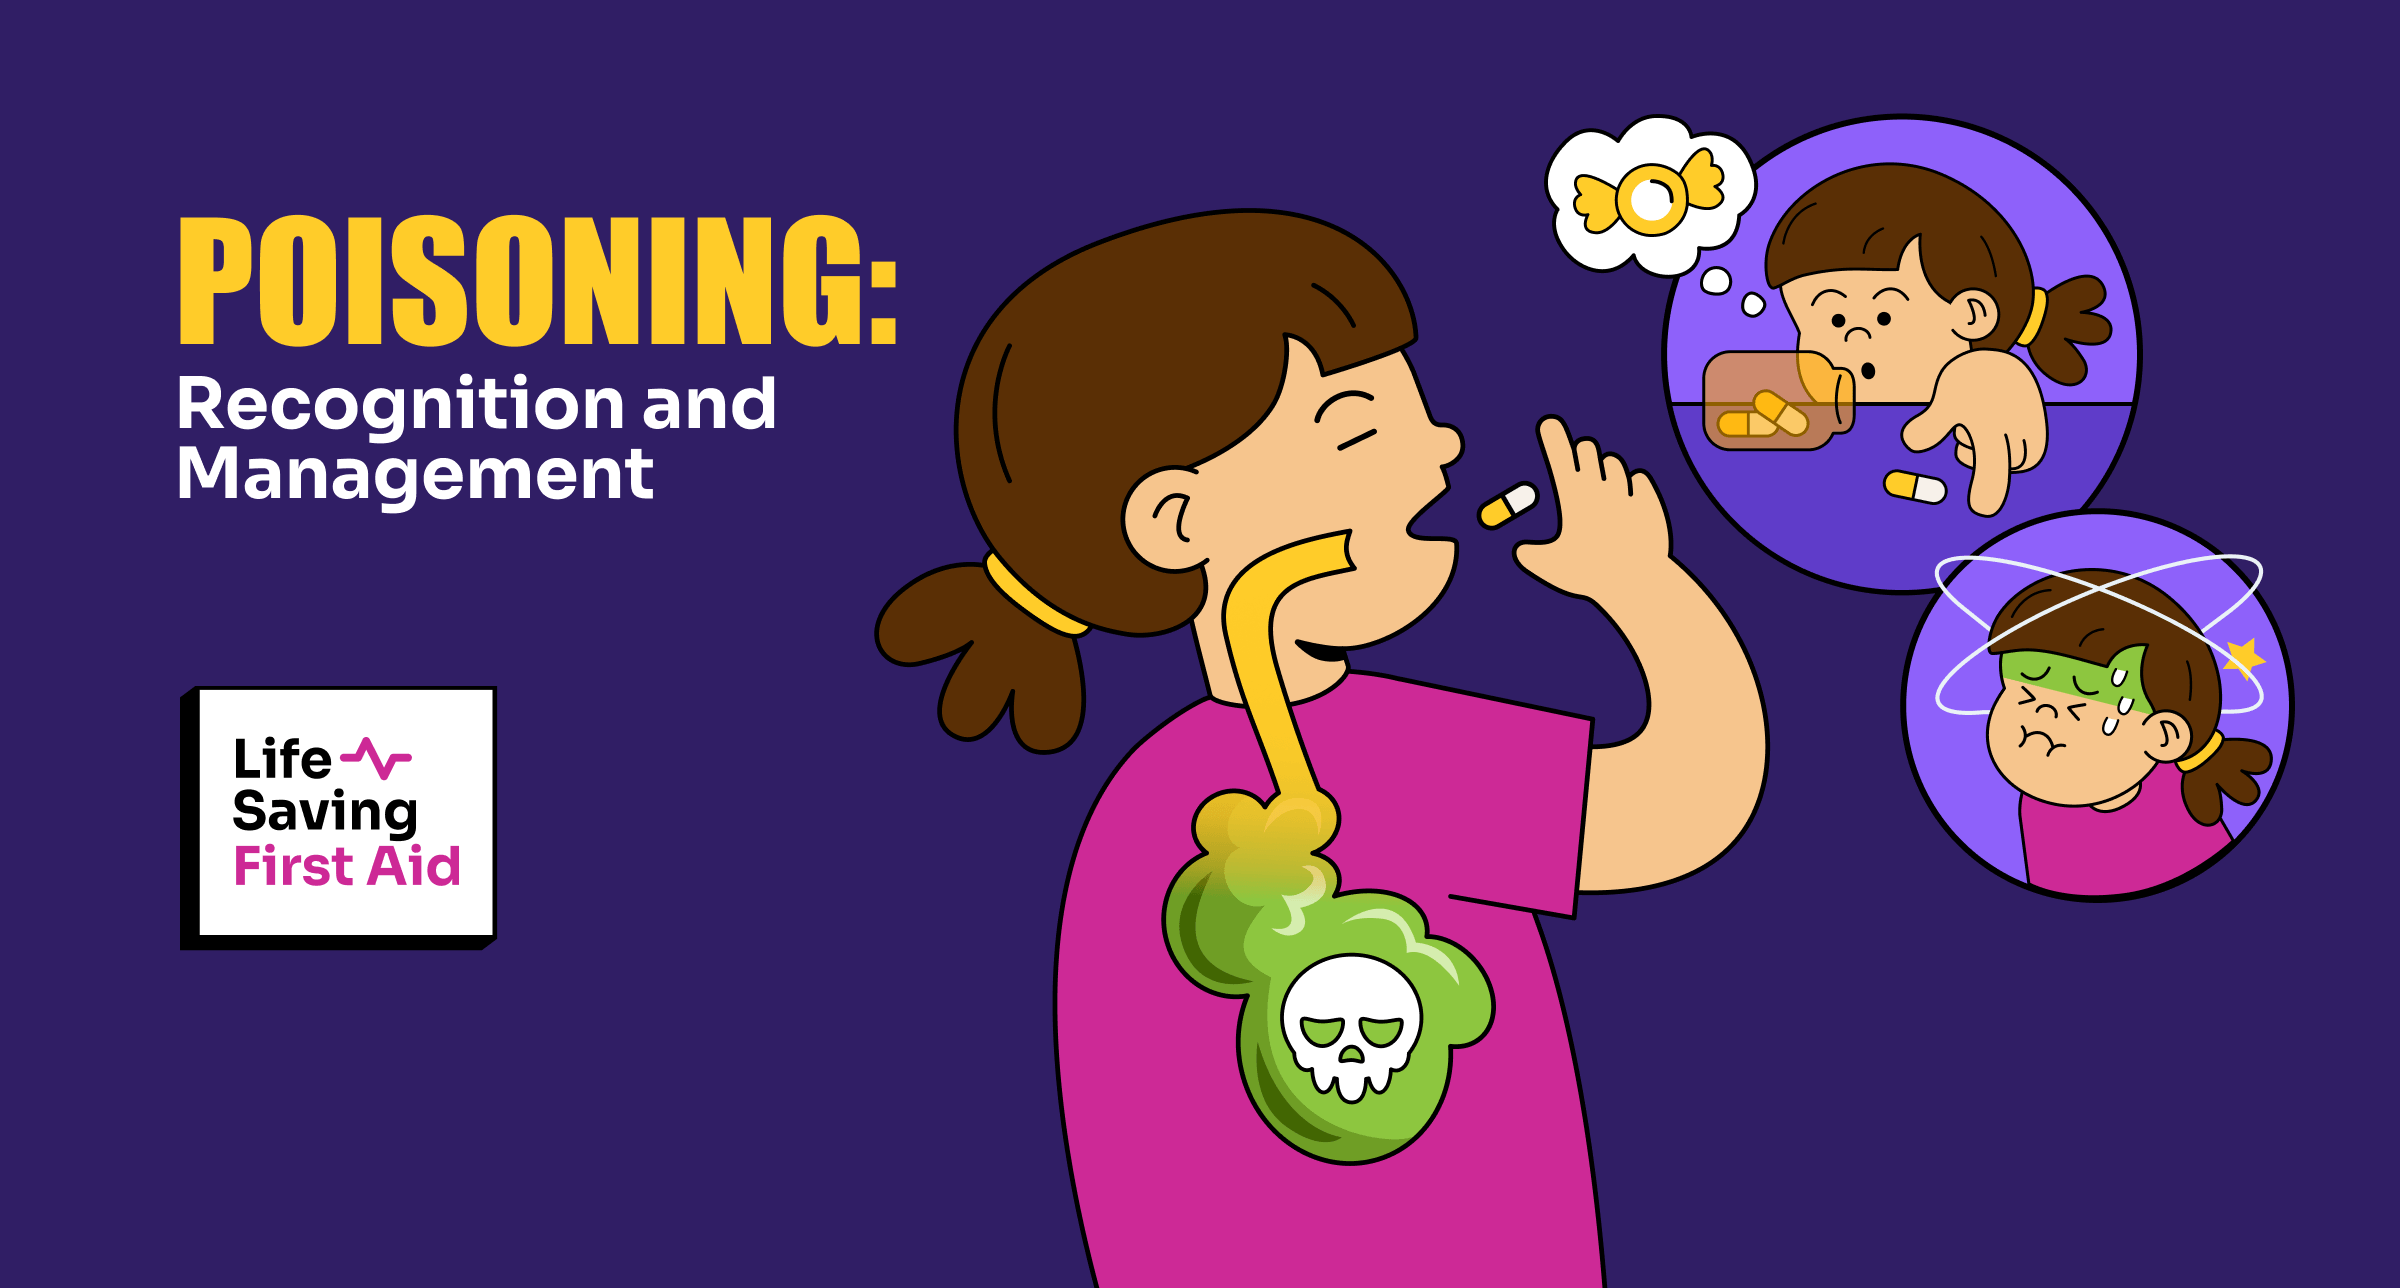
In this article, we will cover Poison recognition and management, and what you, as a First Aider, will need to know to recognise and manage a poisoning emergency.
Poisons: Some facts and figures
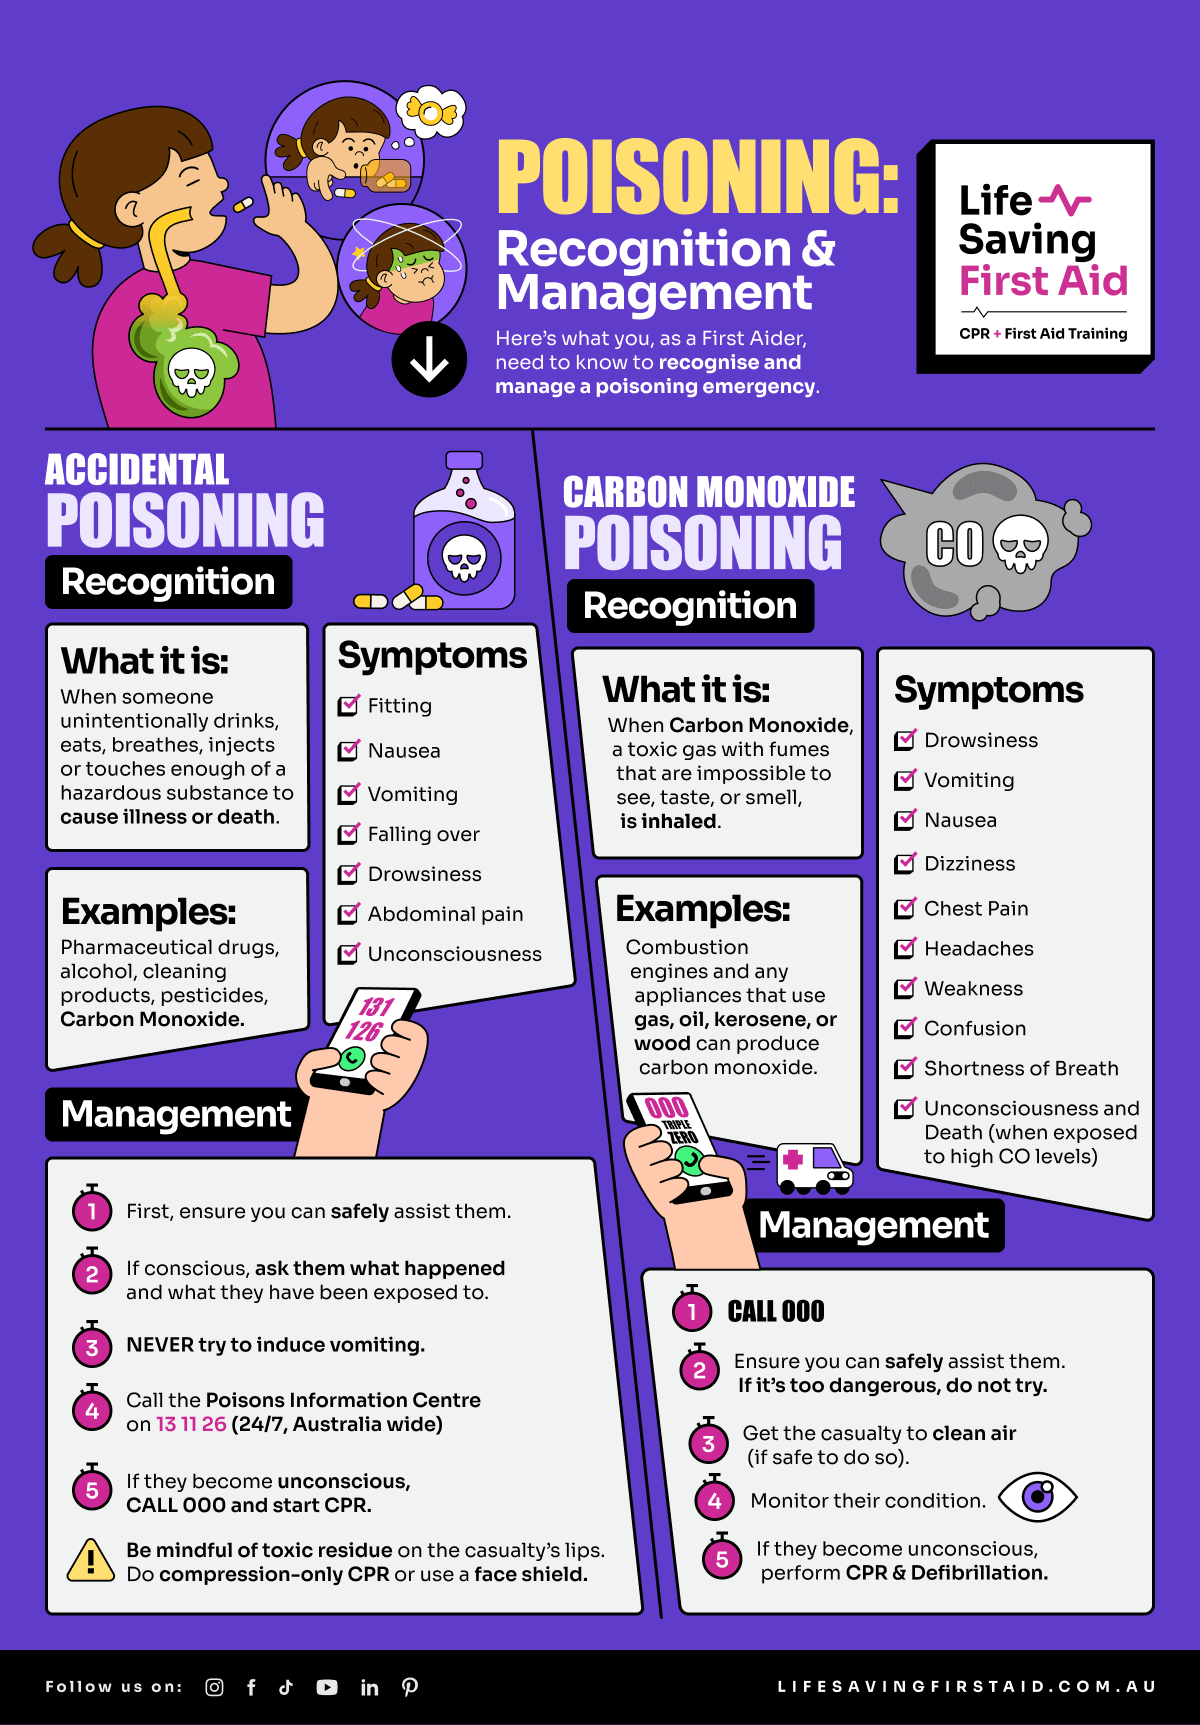
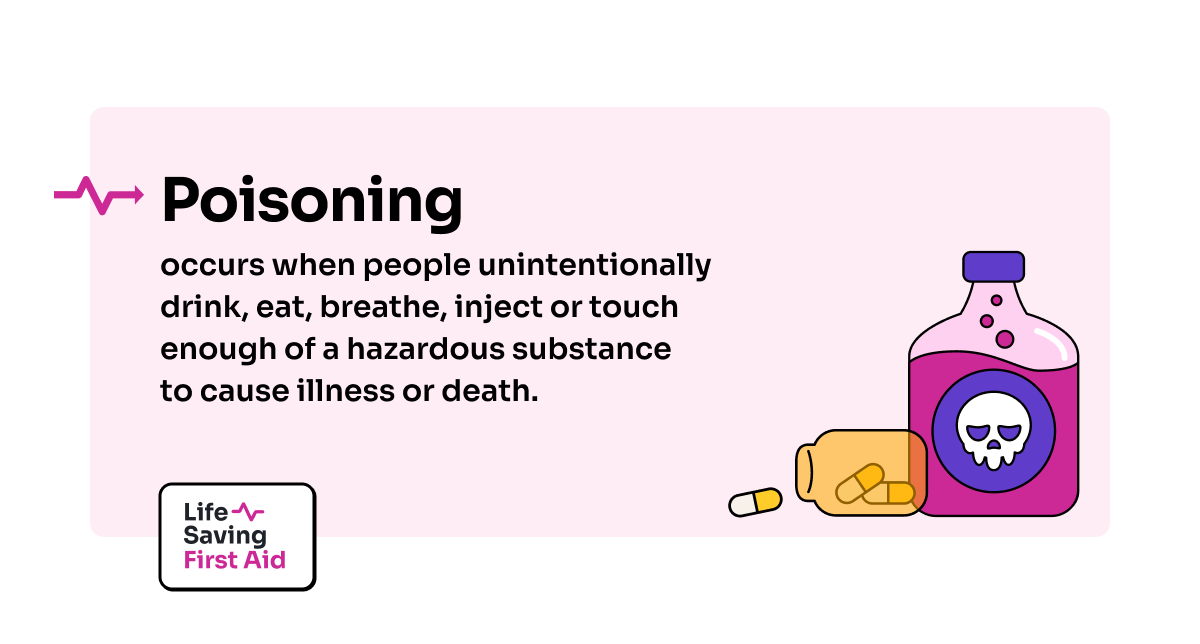
Poisoning occurs when people unintentionally drink, eat, breathe, inject or touch enough of a hazardous substance (poison) to cause illness or death.
Of the hospitalisations, 83% were due to harmful exposure to pharmaceutical drugs. The rest were due to other substances including household cleaners, etc. Young children aged 0–4 had the highest rate of accidental poisoning hospitalisations.
Children are often poisoned by substances left unattended and easily accessed. For instance, on a bench or table, ready to be used in visitors’ bags (medicines), or on bedside tables.
Don’t assume that high cupboards provide safe storage because children learn to climb to get to things. Therefore, a locked cabinet is the best storage option.
Recognition and Managementof Poisoning
If your casualty has had a significant poisoning, any symptoms that develop will depend on several factors. For example, which medicine or chemical is involved and how much the person has been exposed to.
Poisoning Symptoms
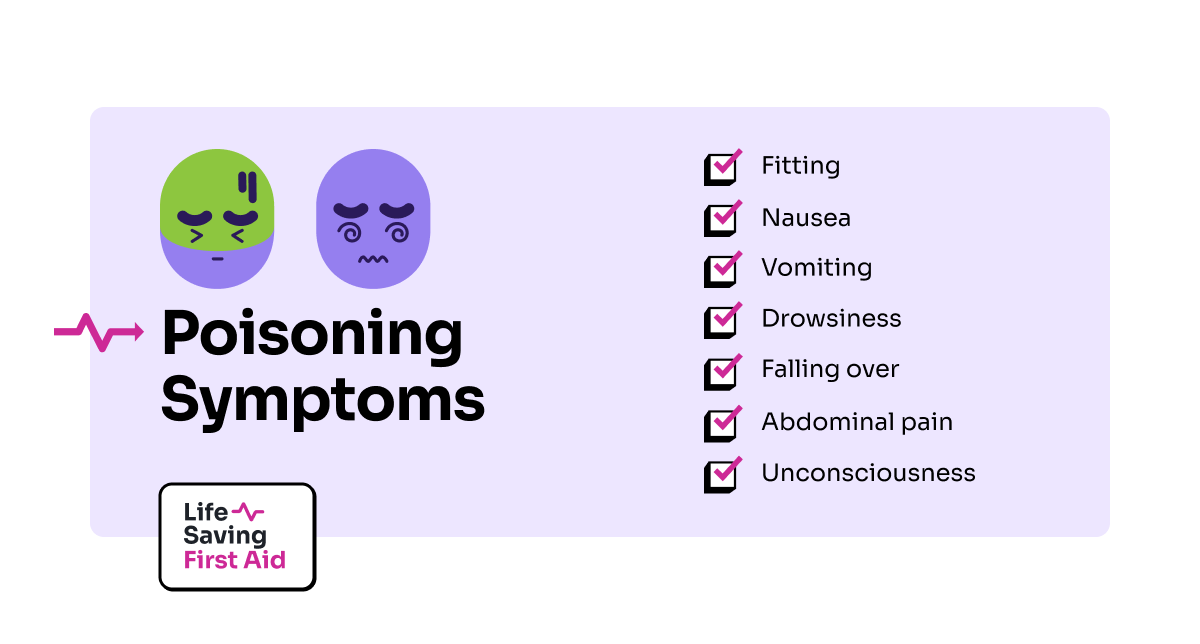
Symptoms of poisoning may include:
Nausea
Vomiting
Drowsiness
Falling over
Abdominal pain
Fitting
Unconsciousness
Poisoning Management
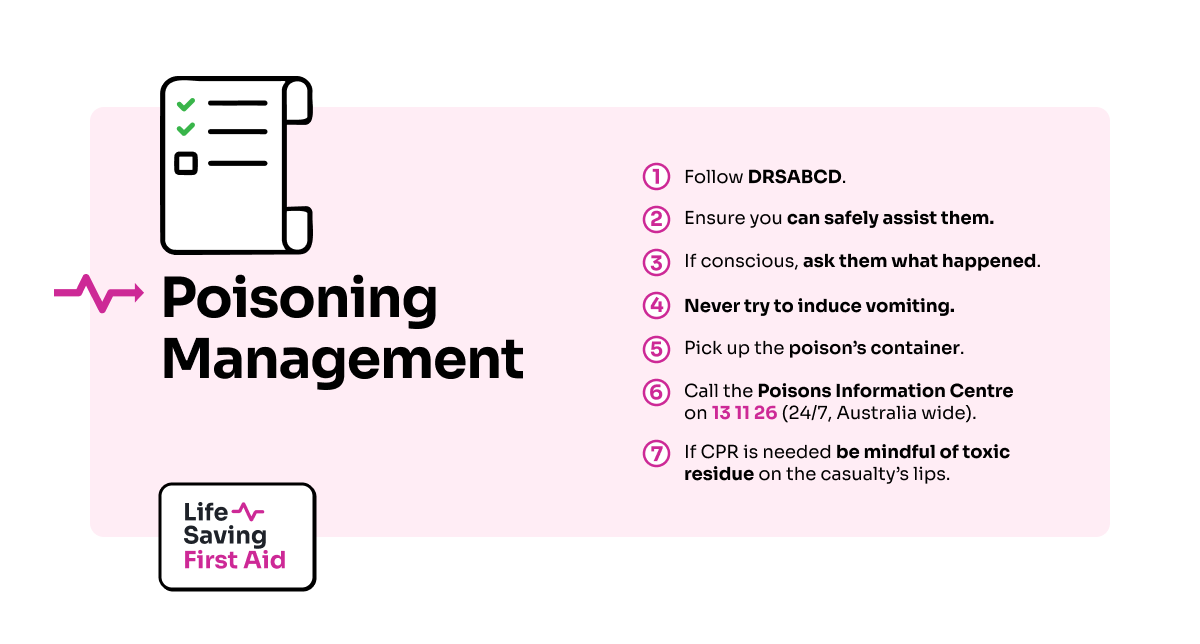
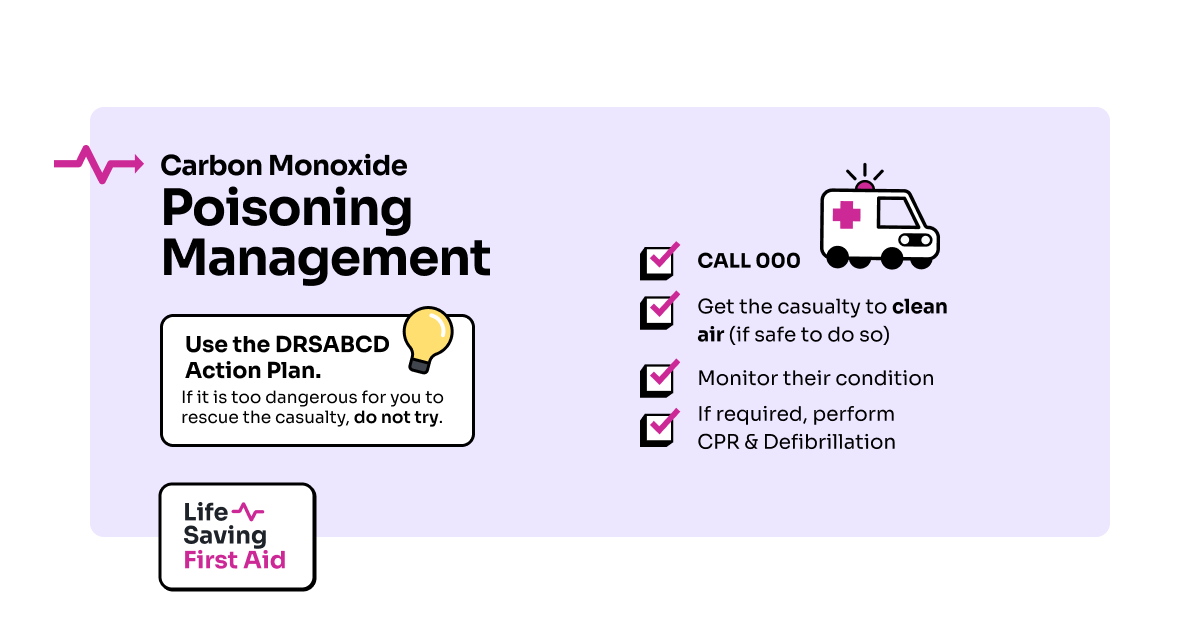
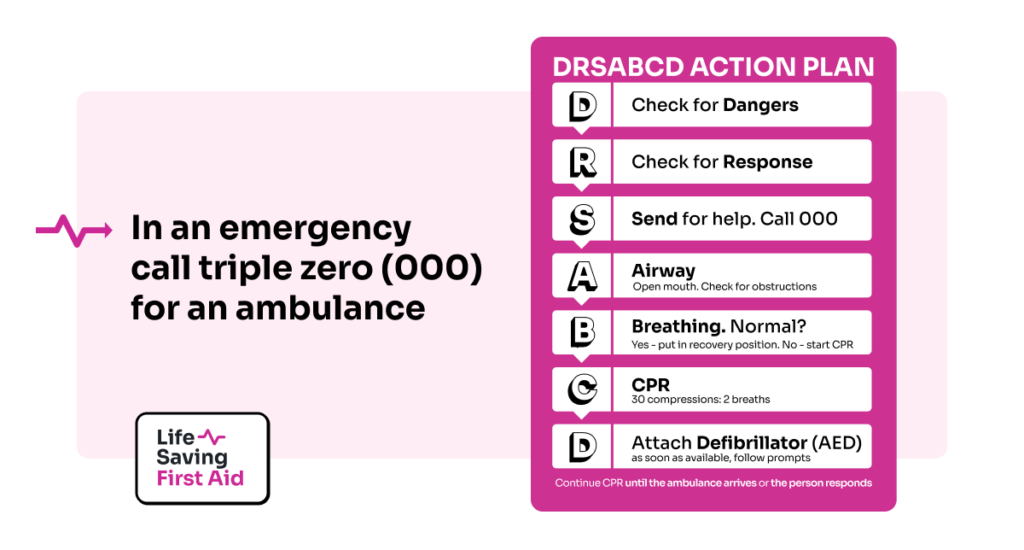
As always with First Aid, we will start with our initial action plan, DRSABCD.
Remember: some poisons are airborne.
If conscious, ask the casualty what has happened and if they know what they have been exposed to.
Never try to induce vomiting.
Pick up the product container (if you have it and it is safe to do so) and take it with you to the phone. The Poisons Information Centre will want to know what ingredients are in the product.
Phone the Poisons Information Centre on 13 11 26 (24 hours a day, Australia wide), where you will get advice on what to do next.
If CPR is needed be mindful of toxic residue on the casualty’s lips, so use a face shield or do compressions-only CPR.
Carbon Monoxide
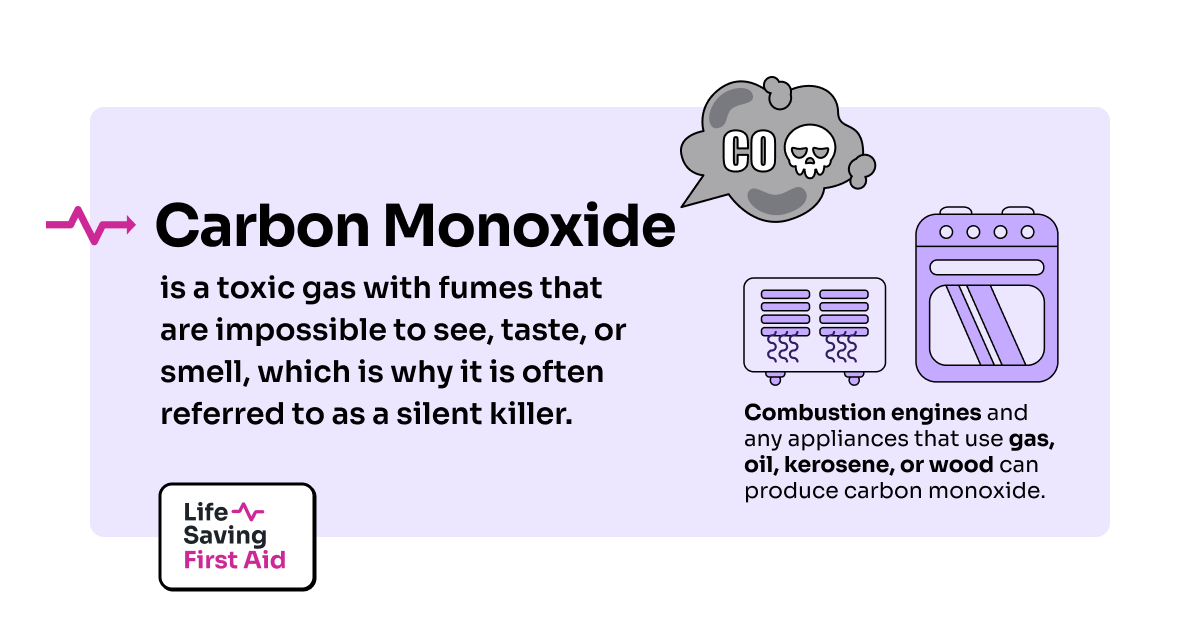
Carbon monoxide (CO) can be a hidden danger that many people are unaware of.
It is a toxic gas with fumes that are impossible to see, taste or smell. As a result, Carbon Monoxide is often referred to as a silent killer.
All combustion engines will produce Carbon Monoxide as well as any appliances that use gas, oil, kerosene, or wood – these can produce Carbon Monoxide too.
Carbon Monoxide PoisoningSigns and Symptoms
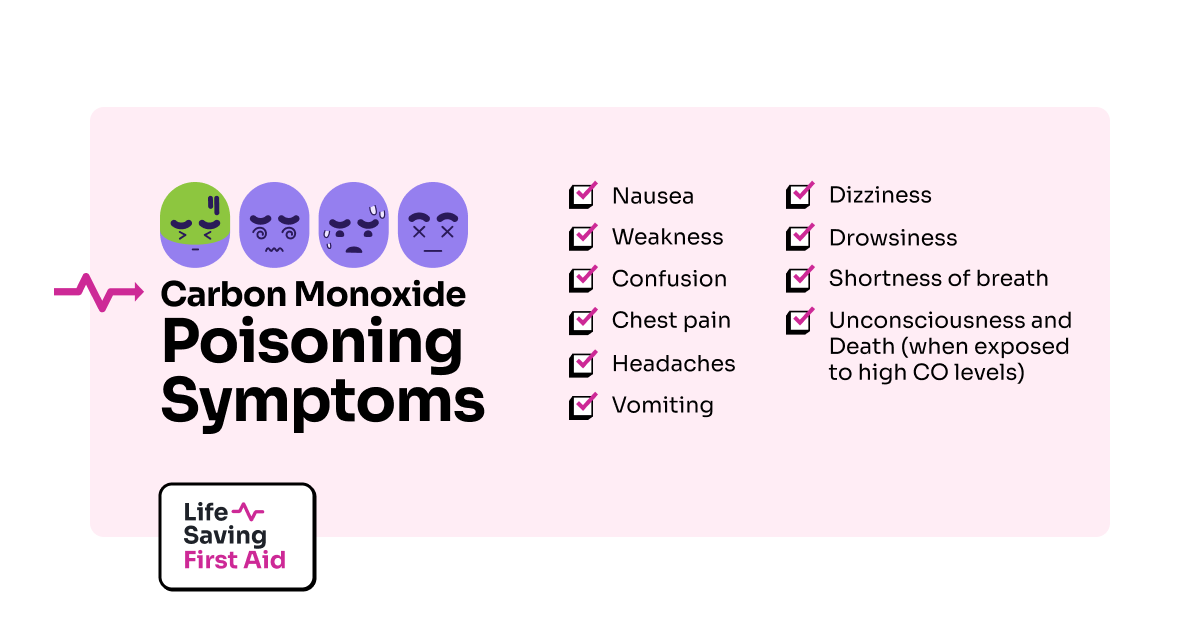
Carbon monoxide poisoning can often be mistaken for viral infections or the flu. Carbon monoxide replaces oxygen in the blood when inhaled and, as a result, this may cause symptoms such as:
Headaches
Drowsiness
Shortness of breath
Dizziness
Nausea or vomiting
Weakness
Confusion
Chest pain
High levels of Carbon Monoxide can cause loss of consciousness and death
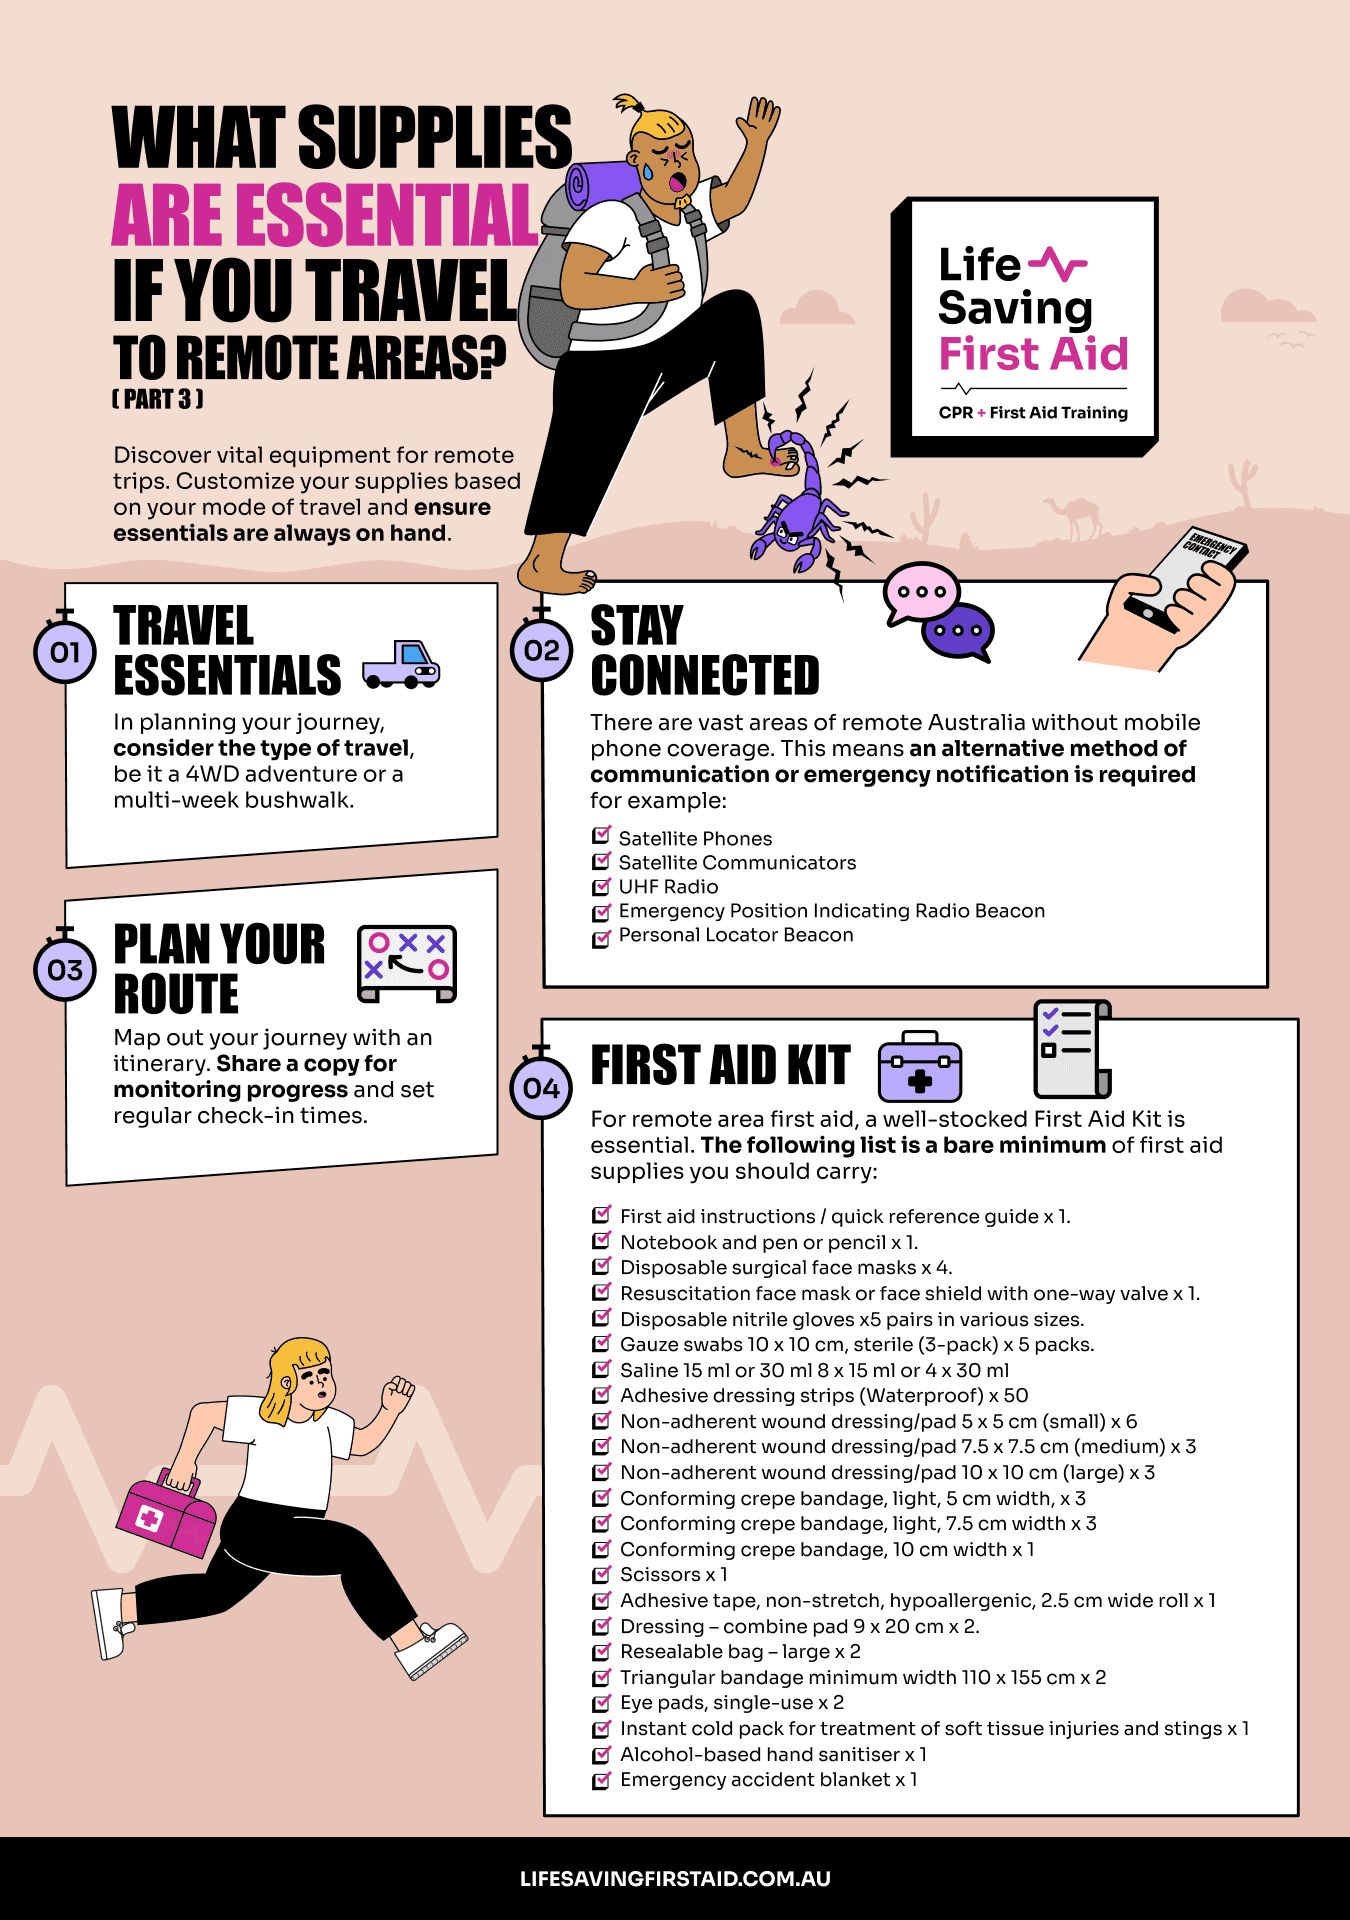
The quantity of supplies and equipment you can carry of course depends on your mode of travel. A 4-wheel drive outback adventure compared to a 3-week bushwalking trek for example.
Regardless of your mode of travel, there are some essentials you will need.
Itinerary
First and foremost, you will need a map or itinerary outlining where you are going, when you should be at certain locations on the map, and your expected ETA at the end of the journey.
One copy for you and another for someone who can monitor your progress and will check to see if you have arrived safely. If possible, you could even arrange regular communication times so that a missed call will trigger a search and rescue response.
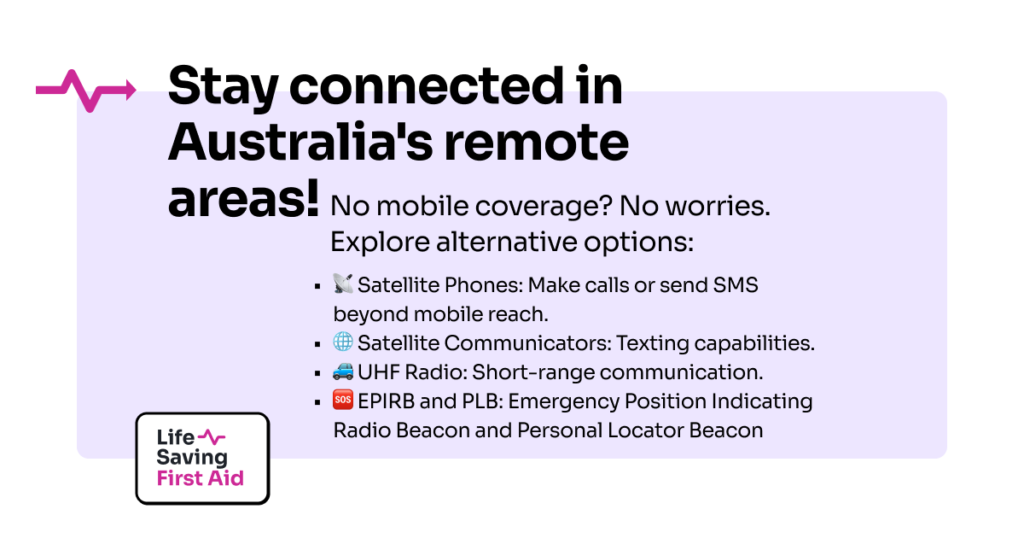
Communications
While we are talking about communications, vast areas of remote Australia are without mobile phone coverage. (Have a look here to get an idea of Australia’s phone coverage.) This means an alternative method of communication or emergency notification is required.
There are lots of alternatives on the market. The list below is just a few of those available.
Satellite Phones – for use when outside mobile phone coverage. They connect directly to satellites and enable you to make/receive calls or SMS.
Satellite Communicators – enable text messaging but no voice communication.
UHF Radio – Generally for short-range communications up to about 5 km.
EPIRB and PLB – Emergency Position Indicating Radio Beacon and Personal Locator Beacon are distress beacons that send an emergency signal along with your GPS coordinates to emergency services via satellite. These devices do not offer any messaging or navigation functions. They are something you carry with you and only use in the event of an emergency.
For a great analysis of remote communications equipment check out the information available here.
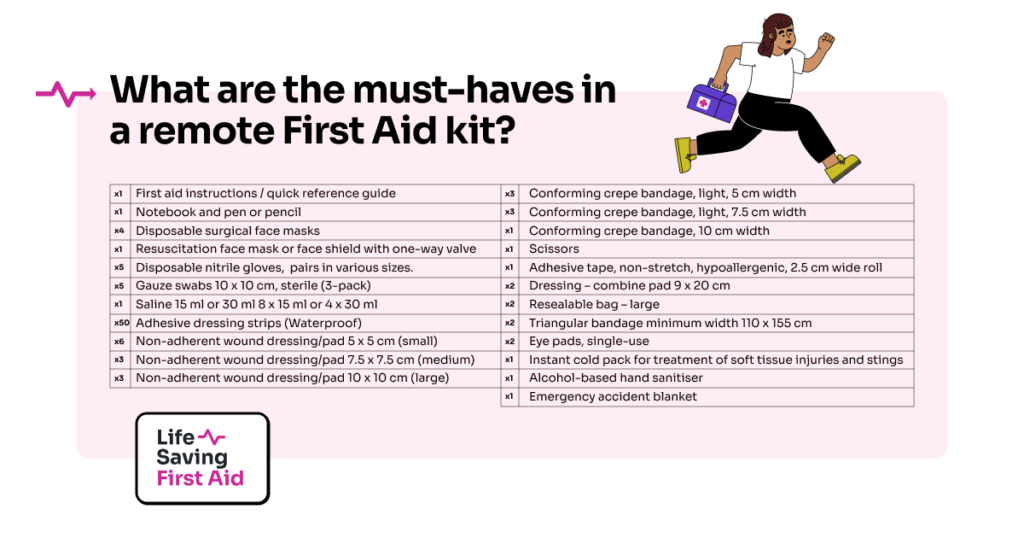
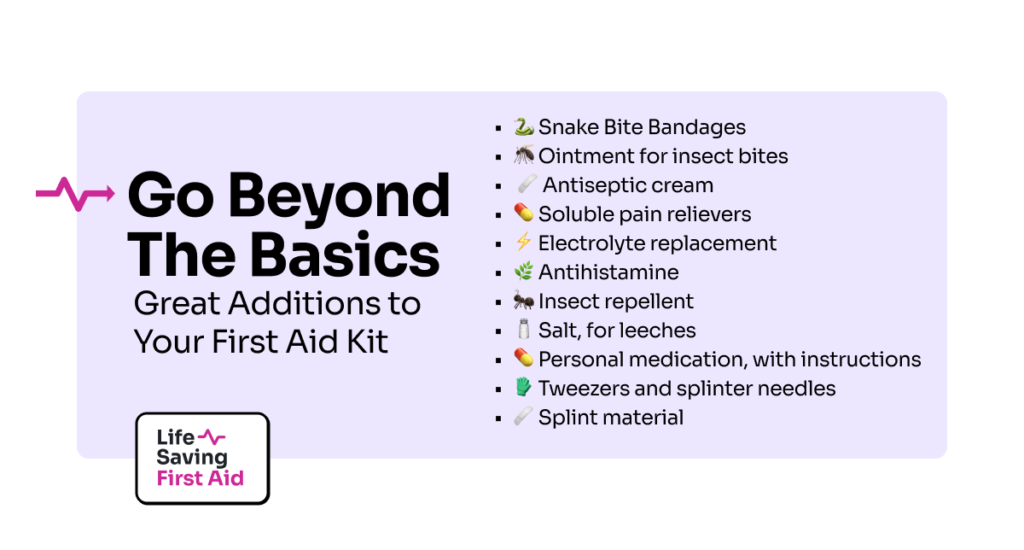
For remote area first aid, a well-stocked First Aid Kit is essential. Once again you might be limited regarding how much you can carry. You may need to compromise on what you would LIKE to have and what you NEED to have.
The following list is a bare minimum of first aid supplies you should carry:
First Aid Instructions/quick reference guide (x1)
Notebook and Pen or Pencil (x1)
Disposable surgical face masks (x4)
Resuscitation face mask or face shield with one-way valve (x1)
Disposable nitrile gloves – nitrile is a latex-free rubber suitable for people with latex allergies (x5 pairs in various sizes)
Gauze swabs – sterile 3-pack of 10 x 10 cm (x5 packs)
Saline (x8 of 15ml or x4 of 30 ml)
Adhesive dressing strips – plastic or fabric (x1 packet of 50)
Non-adherent wound dressing/pad – Small 5 x 5 cm (x6)
Non-adherent wound dressing/pad – Medium 7.5 x 7.5 cm (x3)
Non-adherent wound dressing/pad – Large 10 x 10 cm (x3)
Conforming crepe bandage– Light 5 cm width (x3)
Conforming crepe bandage– Light 7.5 cm width (x3)
Conforming crepe bandage 10 cm width (x1)
Scissors (x1)
Adhesive Tape – non-stretch hypoallergenic 2.5 cm wide roll (x1)
Dressing Combine Pad 9 x 20 cm (x2)
Large Resealable Bag (x2)
Triangular Bandage minimum width 110 x 155 cm (x2)
Single-use eye pads (x2)
Instant cold pack for treatment of soft tissue injuries and some stings (x1)
Alcohol-based hand sanitiser (x1)
Emergency accident blanket (x1)
Extras
You can buy first aid kits already stocked with the basics and add additional items to suit your needs.
As a First Aid Training Company, we are mainly concerned with the Remote Area First Aid side of things. However, we do recognise that other supplies that you take for an outback or wilderness adventure have an impact on your health and safety. Adequate water and clothing suitable for the climate and terrain for example.
So, I have had a look around and found a couple of good websites to help you with your trip planning. (That’s the kinda guy I am…)
Check out this Outback and off-road checklist. It is very comprehensive. As is the website for vehicular travel around Australia.
Also, take a peek at Trail Hiking Australia. As the name suggests, great information for hikers.
Conclusion
Australia is huge and mostly empty. When you are standing in the middle of nowhere, many hours or days from anyone else, it can be very peaceful. It can also be very stressful. The best you can do is be confident in your preparation, your communication systems, and the equipment/supplies you have with you.
As Benjamin Franklin said – “ By failing to prepare, you are preparing to fail”. And, miles from nowhere, nobody really wants to fail.
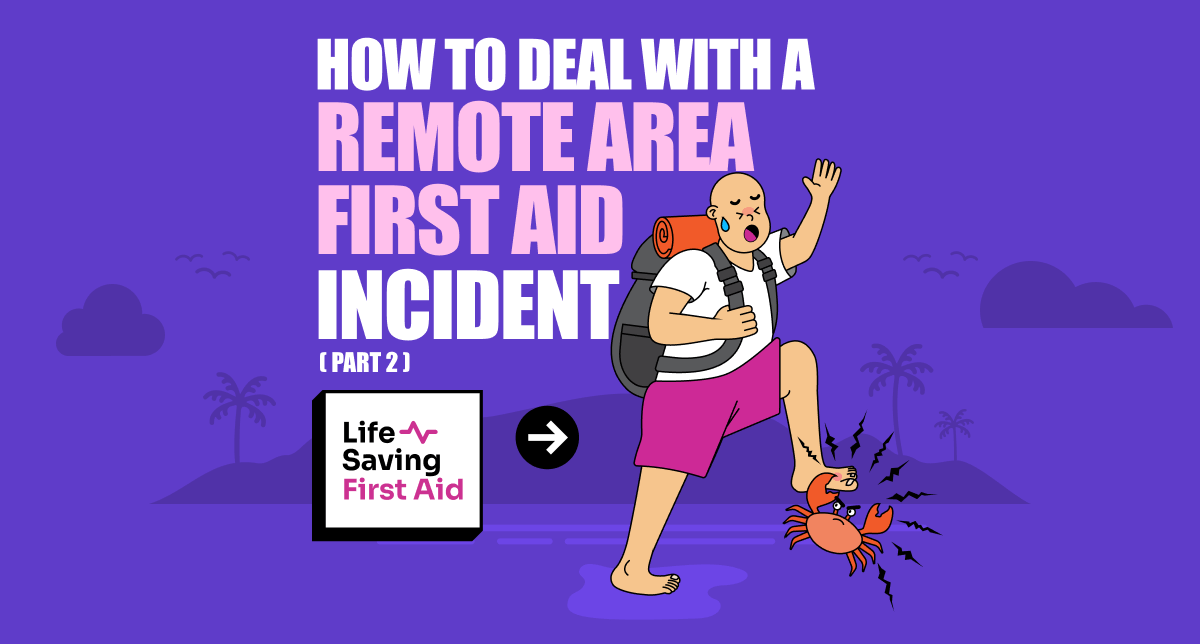
In part one of Remote Area First Aid, we looked at the preparation and some of the considerations associated with it. But you would know that because you’ve read it. If you haven’t then you should.
This time we are going to look at how you, as a first aider can deal with a remote area first aid incident.
There are heaps of diverse adventurous activities undertaken in the Great Australian Outdoors. Most occur incident-free with everyone returning home uninjured. (Perhaps a little sunburnt. But that’s another blog…)
Regardless of the activity, if it goes pear-shaped, the injuries sustained will be similar. Broken this, bruised that, punctured thingummy, or slashed whatsit.
AND, If you are the first aider in the group, YOU will most likely be called upon to answer the question on everyone’s lips – “What are we going to do”?
What are you going to do?
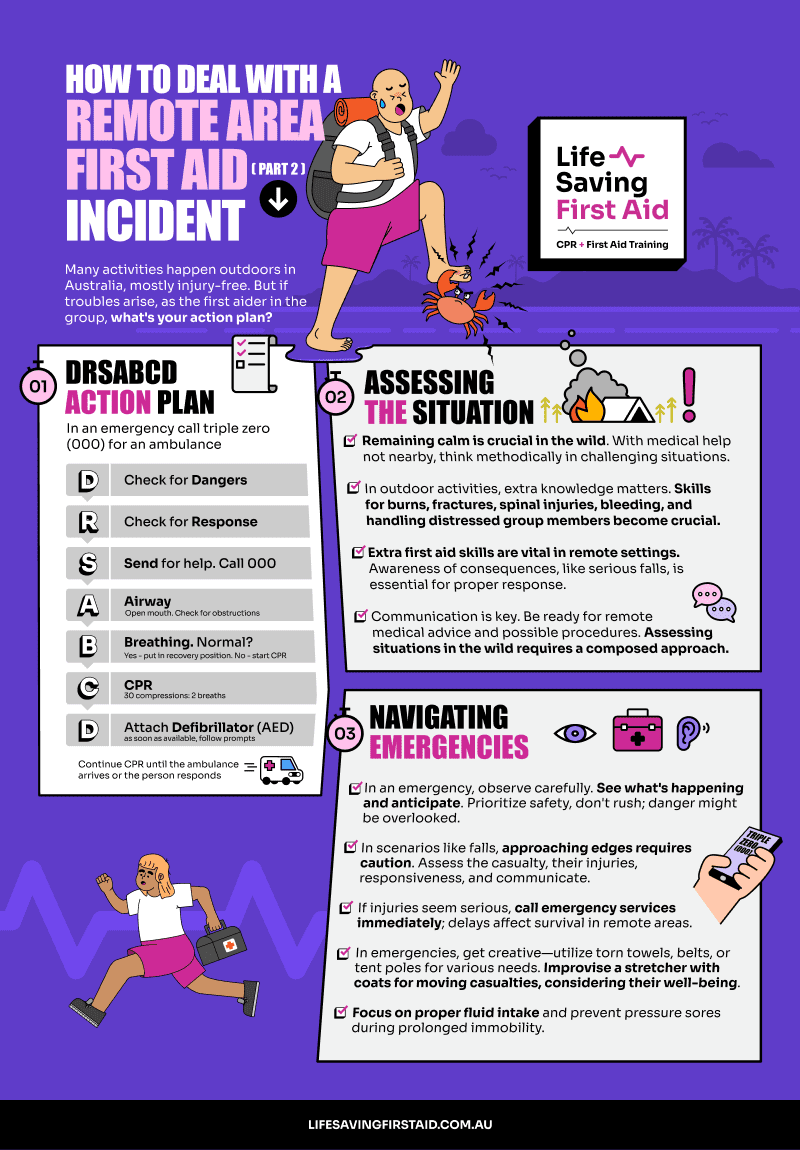
Don’t forget the basics. The initial action plan of DRSABCD:
Danger
Response
Send for help
Airways
Breathing
CPR
Defibrillator
is just as valid in a remote area as it is in the suburbs.
In fact, using this initial action plan should short-circuit the panic impulse. Because it is a checklist plan with a set of actions to complete, as you work through it concentrating on each task, the urge to panic will be reduced. Handy.
Assessing the situation
You need to remain calm and act methodically. Medical assistance is probably not just around the corner.
A remote setting requires some extra first aid skills and a better understanding of actions and consequences.
For example:
Action – casualty has fallen from approx. 5 metres.
Consequences – What are the Consequences? You need to know that a fall from any height above 1.2 metres can cause serious injuries including spinal injuries, head injuries or even death. And falls above 30m or higher are almost 100% fatal. (Check this out: “… lost his footing on an unsecured wooden plank and fell approximately two metres through the gap to the concrete floor below. The worker was taken to hospital with head injuries and later died.” This is from The Australian Institute of Health & Safety)
So, if you are out bushwalking on mountainous or coastal cliff trails this type of extra knowledge would be very useful…
And the extra first aid skills? For this example, the know-how to deal with multiple serious fractures, spinal injury, internal bleeding, and serious head injury. Add a couple of panicking, distressed group members, just to stretch you a bit thinner…
To top it off, if you have communication with medical advice, you may even be required to carry out a medical procedure you are not trained for under the guidance of a doctor on the other end of the phone!
But hey… No pressure. It’s about now that you wished you had stayed home and watched the footy.
Back to assessing the situation.
OBSERVATION
Look at the situation. SEE what’s happened, work out what’s happening, and what could happen next.
Remember, your safety and the safety of the others in the group are paramount! Don’t rush to assist the casualty. You could miss recognising a dangerous situation.
In our example above with a fall, you may have to approach the edge of a drop-off. You may need to use a rope to secure you from falling. Can you see the casualty? Are there any obvious injuries? Can they talk to you? Are they responsive?
Contact emergency services ASAP If you think their injuries are serious. This could mean calling on the phone or sending other members of the group out to get help.
In a remote first aid situation, any delay in organising medical assistance may affect the casualty’s chance of survival.
ACTION
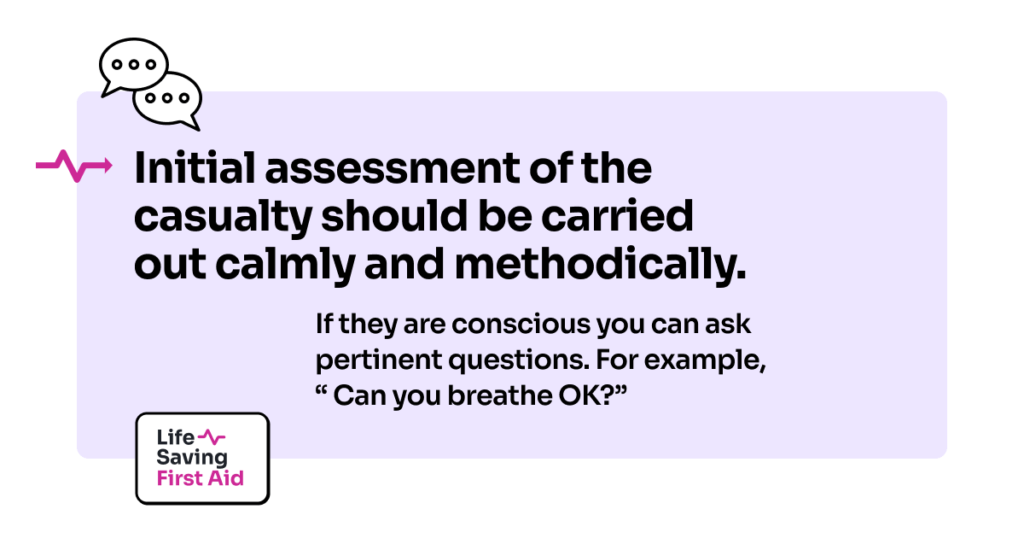
Initial assessment of the casualty should be carried out calmly and methodically. If they are conscious you can ask pertinent questions.
For example, “ Can you breathe OK?” Ask them to take a deep breath. Watch for signs of any discomfort.
If they cannot breathe effectively then examine their chest for any injuries.
Broken ribs from falls are common. Ribs enclose the heart, lungs, and other vital organs. Any severe chest trauma may cause life-threatening injuries to these organs. Broken ribs do not require compression bandaging. Look for signs of internal bleeding.
Make the casualty as comfortable as possible and monitor their condition.
Remember if they are unconscious and breathing, place them in the recovery position even if you suspect a spine or neck injury.
Bleeding
Severe, life-threatening bleeding must be stopped as soon as possible. Apply dressings and bandages as a priority. For profuse arterial bleeding, you may need to apply a tourniquet.
Monitor the bleeding and replace dressings if blood soaks through.
Head and Neck
Head and neck injuries should be suspected when impact injuries have occurred – Falls, aggression, hit in the head etc.
Stabilise the head and neck as soon as possible – use your hands or packing around the head and neck. You may have to deal with life-threatening issues first. Severe bleeding and breathing problems for example.
Head-to-Toe Assessment
Do a head-to-toe assessment as soon as the casualty is stabilised. Check the casualty’s body for broken bones, and severe bleeding. Deal with minor injuries, minor bleeding and non-bleeding wounds later.
History
History of the incident includes what has happened as well as details of the medical history of the casualty. Existing medical conditions, required medications, allergies suffered etc. can be ascertained after any life-threatening injuries have been managed.
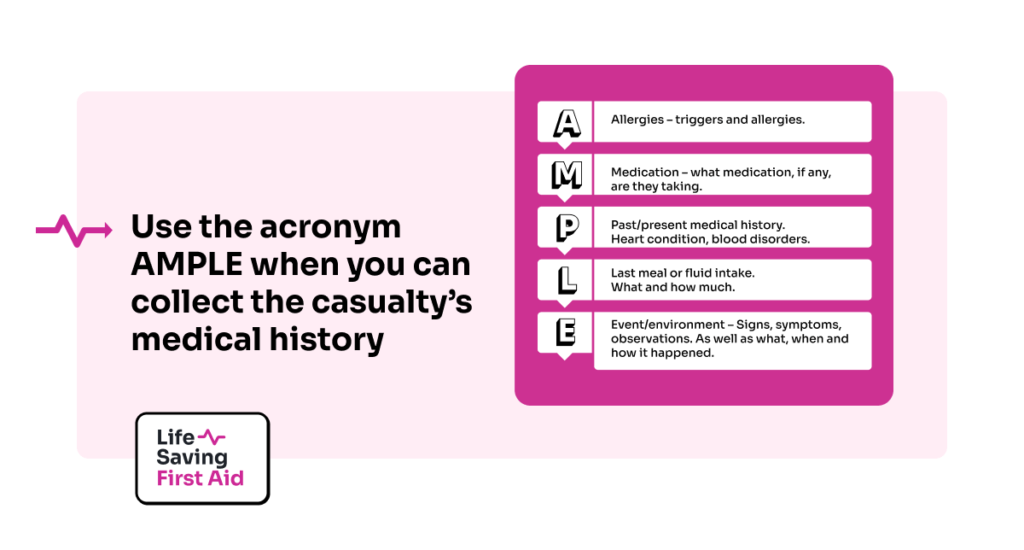
Use the acronym AMPLE when you can collect the casualty’s medical history.
Allergies – triggers and allergies.
Medication – what medication, if any, are they taking.
Past/present medical history – heart condition, blood disorders.
Last meal or fluid intake – what and how much.
Event/environment – Signs, symptoms, observations. As well as what, when and how it happened.
Ongoing Care
Make the casualty as comfortable as possible. Relocate them to your campsite if you can. Or you can build your campsite around them.
If in a hot region, adequate shade, and water during the day. Warmth during the night. Cold, keep warm and dry. Watch for signs of Hyperthermia and Hypothermia.
Remember, you may be some distance or time from assistance. This means you will have to care for the casualty for some time before this help arrives. Also, the type of injury will determine the care required.
A broken leg although potentially very serious will not require the same type of treatment and care as severe life-threatening bleeding.
You could be there for some time and there are no guarantees the casualty’s condition will improve. They could get worse. A lot worse.
Make sure you conduct a thorough check on them regularly – say every 15 minutes for serious injuries to every hour for less serious. Record all your observations.
Look at their:
Conscious State – Very conscious, in and out.
Pulse and breathing rate – within normal limits or otherwise.
Temperature – Normal? High? Low?
Eyes – check pupils. Reaction to light, sizes, dilated or contracted.
Skin for condition and colour – Wet, cold, hot. Normal or bluish.
Headache
Slurred speech
Pain level
Fluid intake and output – measure using a cup or empty tin can (this is especially important if they are vomiting or have diarrhoea).
By making these observations and recording them you will identify any changes and be able to respond to them quickly. This may make a life-or-death difference to your casualty.
Infection
Correct wound management is essential in remote area first aid.
Clean wounds with an antiseptic solution and gently remove as much dirt and debris as possible.
Keep the dressings as dry as possible.
Change dressings as required. If blood soaks through or they get wet, for example
Check circulation on bandaged limbs.
Check splint bandages for firmness.
You don’t want to add to your problems through the infection of a superficial wound. Especially if medical help is some time away.
General Considerations
You may have to improvise:
Torn-up towels, sheets or shirts can be used for extra dressings.
Shoelaces, belts, or rope can be used to attach splints.
Tentpoles or bits of wood can be used for splints.
Plastic bag, bucket, water bottle for immobilised casualty toilet.
For immobile casualties, going to the toilet is a problem you will face. Use what’s available to collect their bowel movements and urine and ensure handwashing/sanitising protocols are strictly followed.
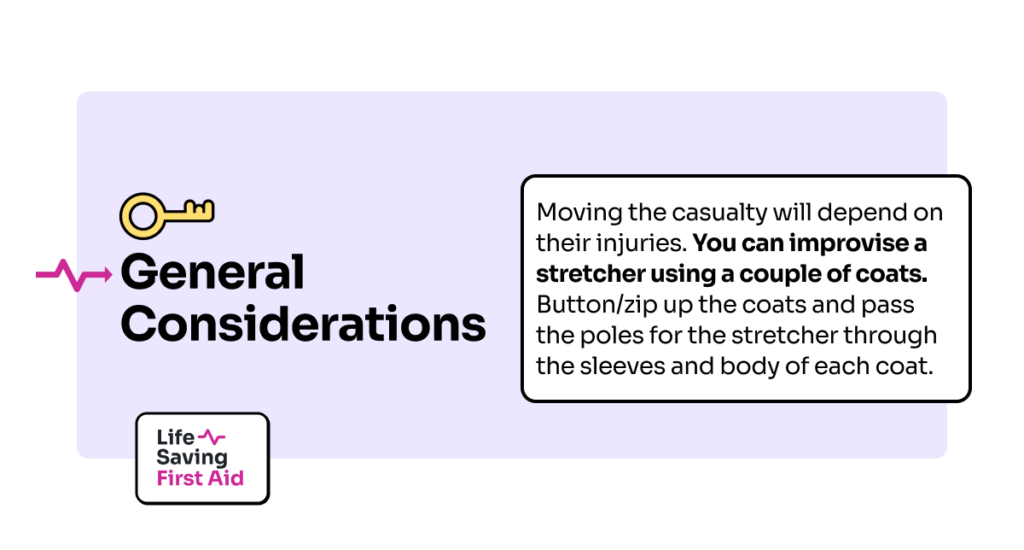
Moving the casualty will depend on their injuries. You can improvise a stretcher using a couple of coats. Button/zip up the coats and pass the poles for the stretcher through the sleeves and body of each coat.
You will need to decide on any movement of the casualty. What’s best for them is the priority.
Fluids. Frequent small amounts of water is the best method. If you have some electrolyte powder, or similar, you can add it to the water.
Increase the casualty’s water intake if the casualty has diarrhoea.
Be mindful that if the casualty has serious injuries requiring surgery stop giving them water 4 to 6 hours before their surgery.
And, if you’re thinking that’s enough, wait there’s more!
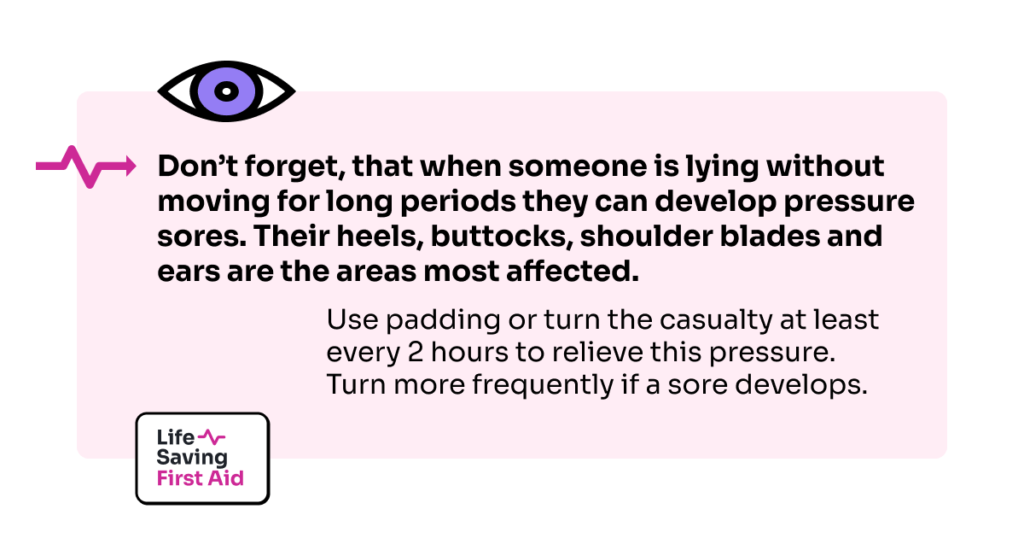
Don’t forget, that when someone is lying without moving for long periods they can develop pressure sores. Their heels, buttocks, shoulder blades and ears are the areas most affected.
These sores are caused when blood circulation is reduced to the skin in those areas remaining in contact with a hard surface such as the ground.
Use padding or turn the casualty at least every 2 hours to relieve this pressure. Turn more frequently if a sore develops.
Conclusion
There’s a lot in Remote Area First Aid. The preparation before you go (Remote First Aid Part 1). The responsibility as a first aider should anything happen considering the distance/time away from medical help. The extra gear you have to carry (Remote First Aid Part 3).
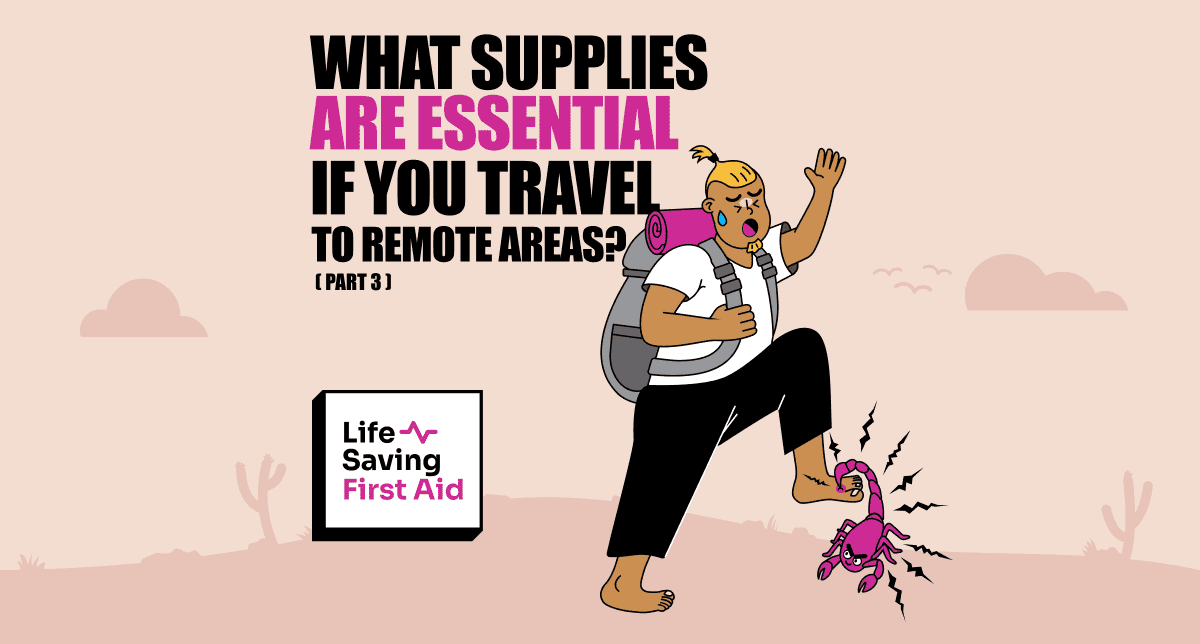
In Part 3 of our Remote Area First Aid article, I will offer some suggestions for the contents of a first aid kit, and how to stay in contact while you are away.
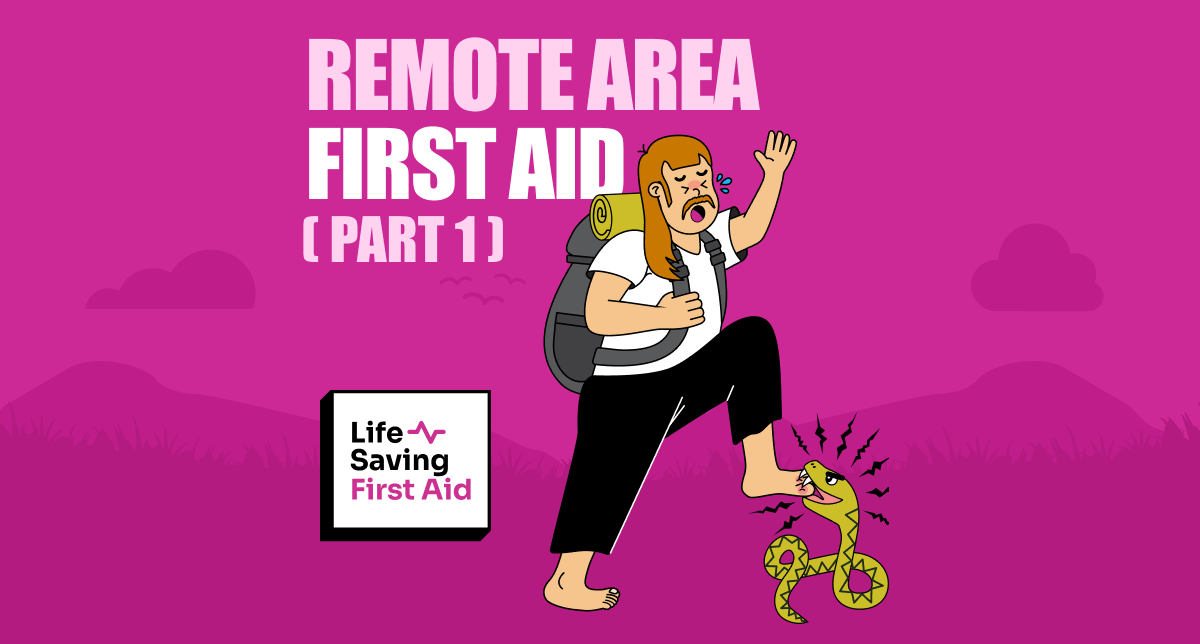
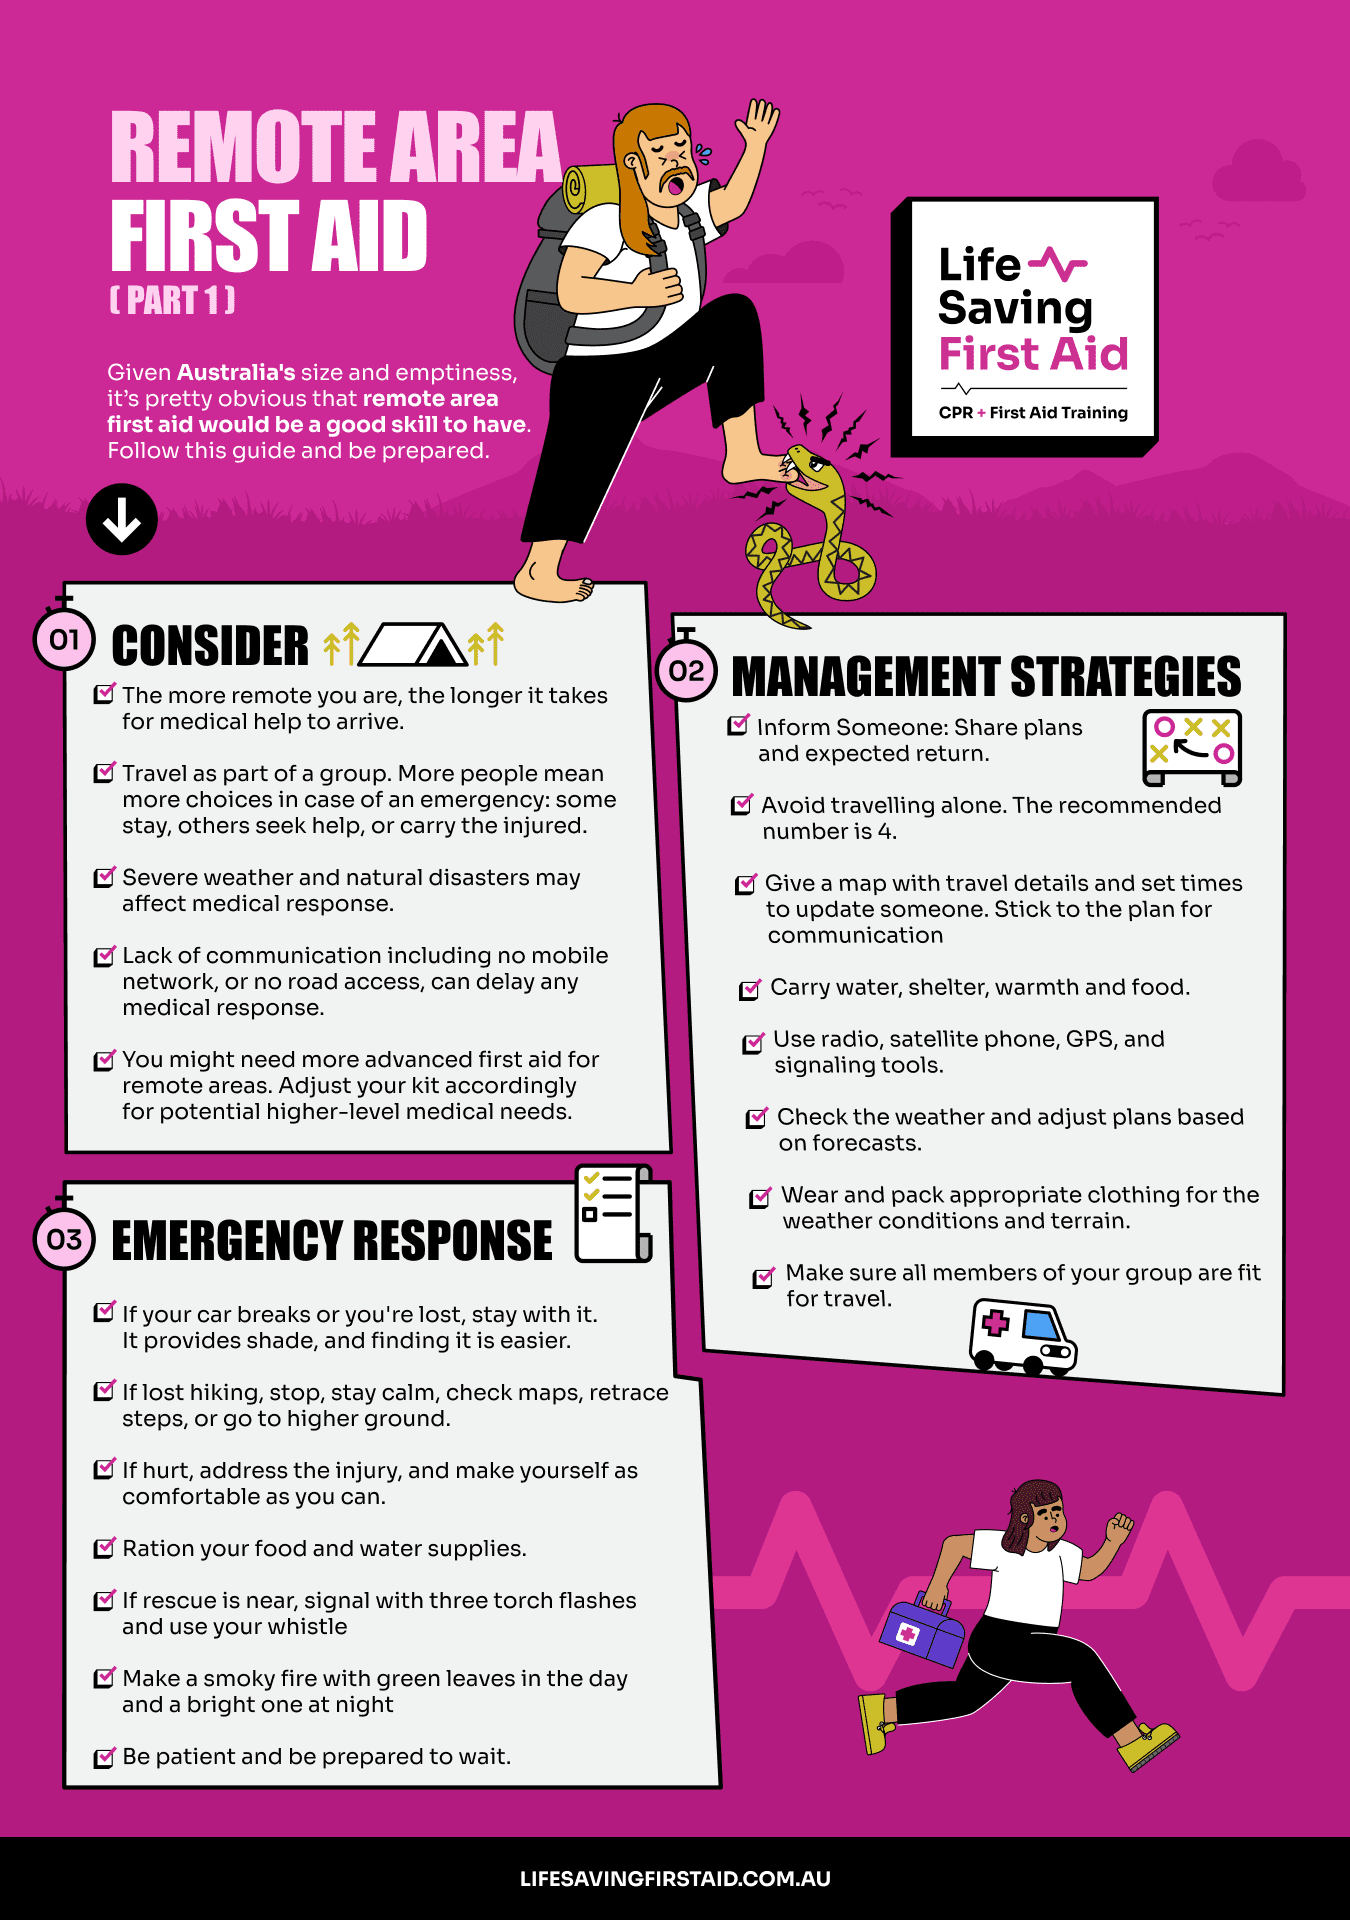
Given Australia’s size and emptiness, it’s pretty obvious that remote area first aid would be a good skill to have. If you don’t know how barren Australia is just have a look at Australia on Google Maps. Use the satellite view and a nighttime view as well. There’s a couple here – Night Time Australia.
Australia is empty.
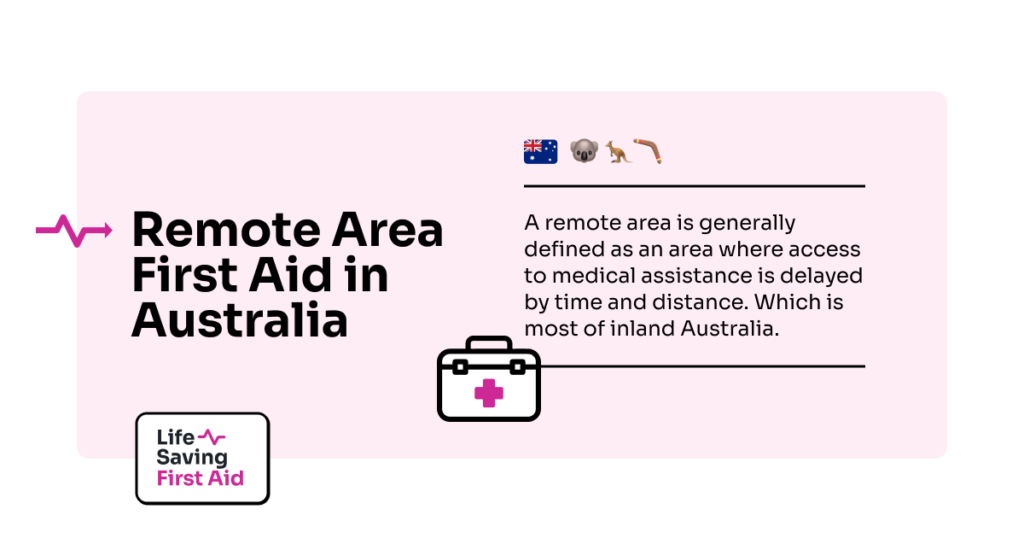
A remote area is generally defined as an area where access to medical assistance is delayed by time and distance, which is most of inland Australia.
However, remote for First Aid purposes could be anything over an hour, or 50 km, from a city or a country town.
If you are in a remote area and have the ability to manage injuries with skill and confidence you may be able to prevent complications. Complications which would hinder a speedy recovery.
Because you can’t call an ambulance and expect one to arrive within a reasonable time, remote area first aid has its own unique set of considerations.
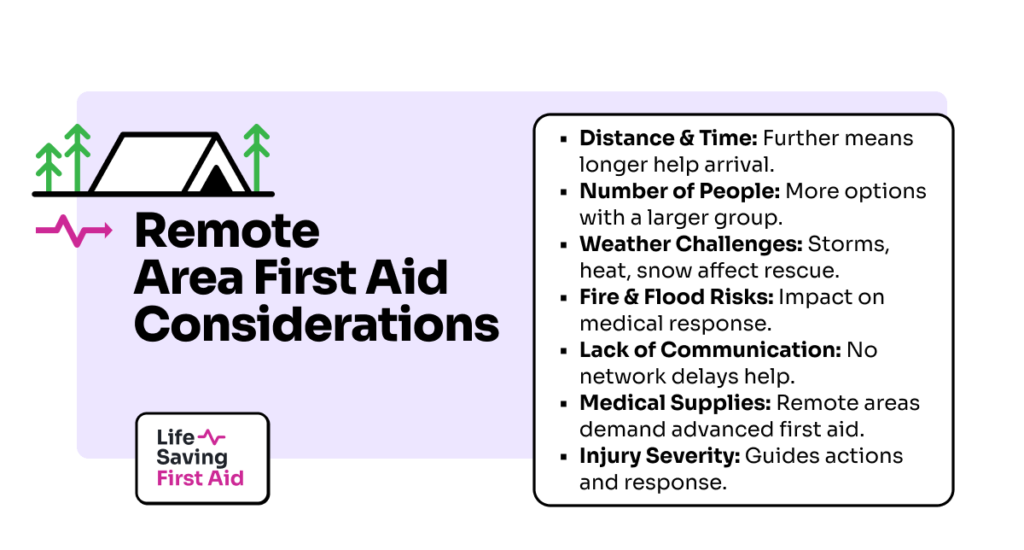
Remote area First Aid considerations
Distance – The further you are from medical/ambulance assistance generally means it will take longer for that assistance to reach you.
Time – As for distance, the further away the more time it will take. However, in some cases, you may only be a couple of miles away from aid BUT it may take days to reach you. Mountainous areas for example.
Number of people in the affected party – This will determine what can be done if someone becomes injured. The more people in the group, the more options you may have. One or two people could stay with the casualty, others could go for help. There may even be enough people to carry the injured person out.
Weather Conditions – Storms may prevent aircraft, as well as land transport, from reaching the casualty. High temperatures may inhibit a quick on-foot rescue. Deep snow the same.
Fire and Flood – (What? In Australia? – surely not!) There’s no denying that these are fairly commonplace within Australia. These natural disasters will have an impact on medical response time if they are happening in your area.
Lack of communication – No mobile network. No road access. Lack of communication will, of course, delay any medical response. Lack of communication may also deprive you of contact with a doctor and the provision of medical advice.
Medical supplies – When travelling in remote areas the level of first aid you may be required to perform may be higher than the level of first aid closer to home. This will have an impact on the contents of your first aid kit.
The severity of the injury – This will determine your actions and response.
After reading the list above you can see how isolated you might feel if you are out in the great outdoors with a couple of friends and something injurious happens.
Let’s make it worse… You’re by yourself.
Management Strategies for remote area First Aid
While there are some extra things you need to consider for remote area first aid, it is important to remember that the basic principles of first aid remain the same.
The initial action plan of DRSABCD is just as valid in a remote area as it is in the suburbs. What does make a difference is a sound knowledge of survival techniques and correct preparation before remote area travel is undertaken.
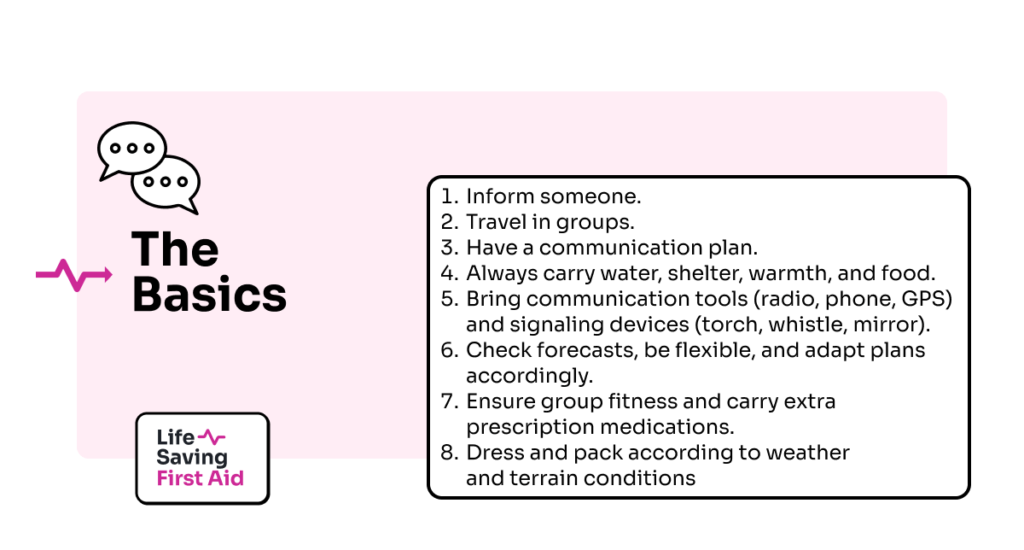
The Basics
First and foremost, tell someone where you are going and when you expect to be back. You might even organise before you leave what to do if you do not return at, or close to, the expected time.
Avoid travelling alone. The recommended number is 4. That way one can stay with the injured person and two can go for help.
Leave a map with your travel details on it and organise a schedule of times when you will contact a nominated person. Keep to the schedule.
Remember there are four vital requirements to support life. Water, shelter, warmth, and food. Make sure you set out with an adequate supply of these vital requirements to sustain you should you become stranded. Even if you are planning to go to a remote area for only a short period.
Take appropriate communications and location equipment for the area you are going to. Know how to use them. These may include a long-range radio or mobile satellite phone, global positioning system, emergency position indicating radio beacon and maps. Use a torch, whistle or mirror to signal for help.
Check weather forecasts before you depart and while you are away. Be ready to change your plans or delay the trip if necessary.
Ensure all members of your group are fit for travel. Carry extra prescription medications for the journey.
Wear and pack appropriate clothing for the weather conditions and terrain.
So, planning and preparation beforehand is the key. However, even the best preparation and planning cannot prevent an emergency.
Remote Area First Aidemergency
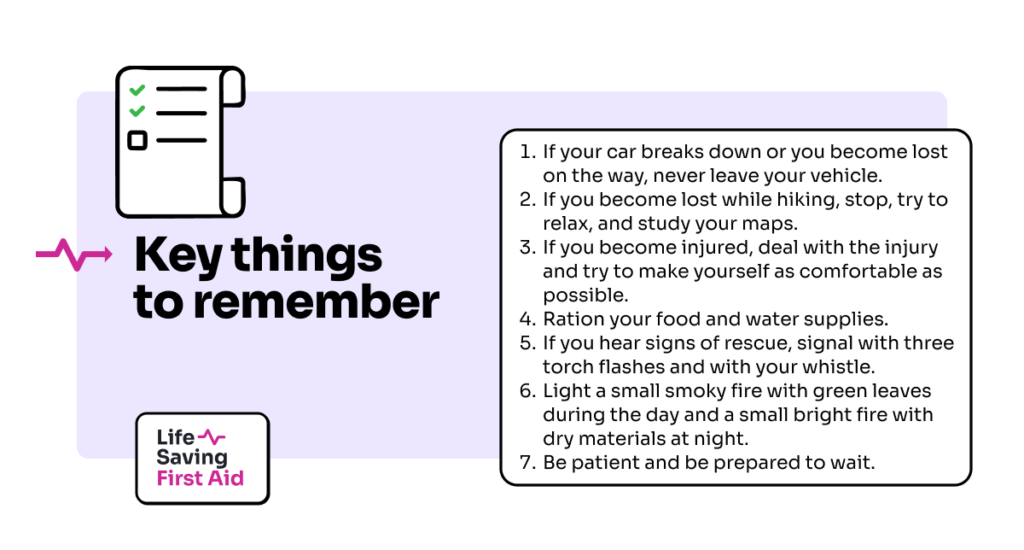
If well planned, your trip should go smoothly and safely, but if you get into difficulty, here are a couple of key things to remember:
if your car breaks down or you become lost on the way, never leave your vehicle. You can use it for shade and shelter. Also, it is easier to locate a missing vehicle than a missing person in the vast Australian Outback.
if you become lost while hiking, stop, try to relax, and study your maps. See if you can determine where you came from and slowly make your way back. If you can’t find your way back, move to higher ground for a better view.
If you become injured, deal with the injury and try to make yourself as comfortable as possible.
Ration your food and water supplies.
If you hear signs of rescue, signal with three torch flashes and with your whistle.
Light a small smoky fire with green leaves during the day and a small bright fire with dry materials at night.
Be patient and prepared to wait.
Other outback emergency considerations especially if you are in a group.
Continue or stop. Somebody will have to decide whether the casualty is able to continue the journey, or it should be abandoned to care for the injured person. Or maybe take them out to medical aid. Whoever makes that decision should consider the welfare of the whole group.
Medical assistance. If you are able to call for assistance you will now have to decide whether you go to the assistance or wait for the assistance to come to you. The severity of the injury, time factor – travel out vs travel in. Can the casualty even be moved? Will determine your decision.
Time Frame. Because of the distance and extended time frame for assistance, the casualty may become more stressed. The decision maker/first aider will need to remain calm and reassure the casualty. Regularly monitoring the casualty’s condition will help reduce anxiety levels. Make sure they are as comfortable as possible.
Observations. Keep notes on the casualty’s condition. Record things like changes in signs and symptoms, vital signs, and first aid provided. Monitor and record fluid intake and output. Be aware that the casualty may go into shock.
Shelter and survival. Try your best to shelter the casualty from the elements. Keep them as comfortable as possible. Keep cool if hot and warm if cold.
Ok. Now all of the above may have felt like death by dot point. But when you stop and think about it, moving around this great empty country of ours does require planning and preparation.
There are about 40 deaths per year in the Australian outback. Most are due to motor vehicle accidents. However, people do perish directly as a result of poor preparation.
If you want to hike around in remote parts of Australia then I suggest you do your research, complete a Provide First Aid in a remote or isolated site course, plan your trip – using the above articles as a guide and try not to travel alone.
I have deliberately not given details of how to deal with First Aid emergencies, contents of first aid kits, communications equipment etc.
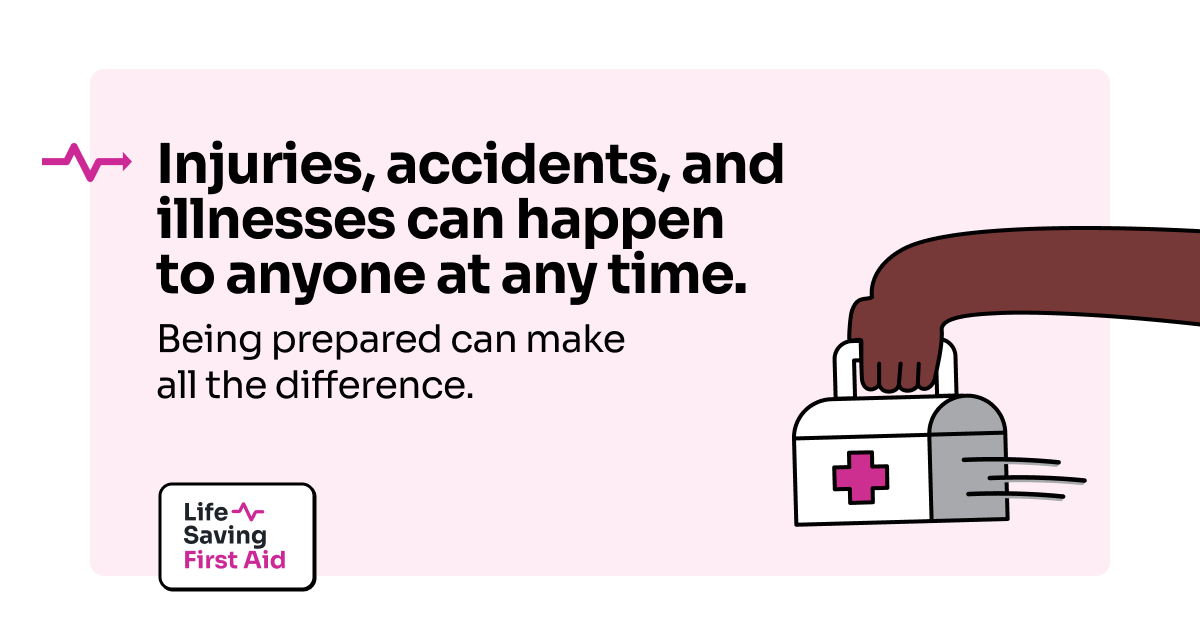
When it comes to emergencies, you never know when you’ll need a helping hand – or a first aid kit! Using our First Aid Checklist you will have a fully stocked First Aid Kit at the ready.
Injuries, accidents, and illnesses can happen to anyone at any time, and being prepared can make all the difference. Not only does it give you peace of mind, but it can also potentially save someone’s life or, at the very least, help alleviate pain and discomfort. So, let’s dive into why having a first aid kit on hand is more important than ever!
This article will include all the information required for the ultimate First Aid Kit Checklist for your situation. We have you covered for everything, including the necessities like gauze and sticky bandages, and tailoring your kit to meet your requirements.
We’ll also offer you the inside scoop on properly storing your first aid kit, whether for use at home, in the vehicle, or on outdoor excursions.
We’ll also throw in a few pointers for keeping your stuff accessible and organised, so you’ll never be caught off guard.
After using our First Aid Kit checklist, you’ll feel like a first aid kit expert. We guarantee it!
The Essentials of a First Aid Kit
So, what are the essentials for a first aid kit, you ask?
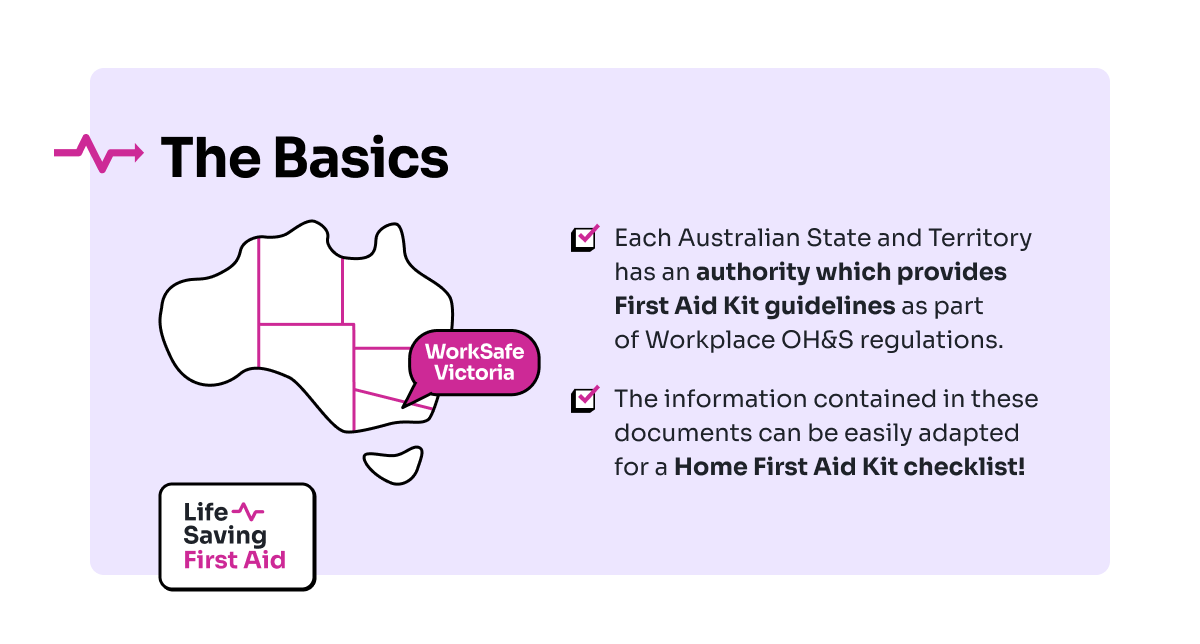
Well, let’s start with the basics. In Australia, each State and territory has their regulatory authority that offers rules, regulations, and Codes of Practice regarding Occupational Health and Safety in the workplace. This includes thorough guidelines regarding the checklist for first aid kits!
The various regulatory authorities in Australia are:
The information contained in these documents can be easily adapted to home or domestic scenarios such as family parties and get-togethers since it has been written in an easy-to-read manner.
Later we will discuss considerations you can make to customise your first aid kit specific to your requirements.
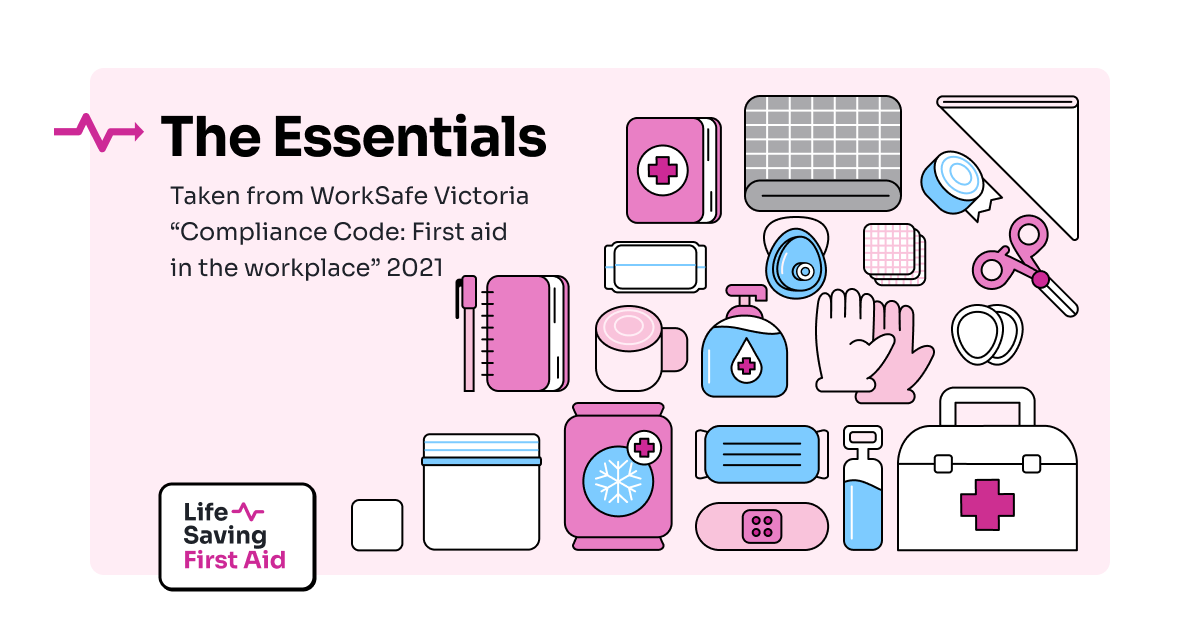
The Ultimate First Aid Kit Checklist: Essentials Edition
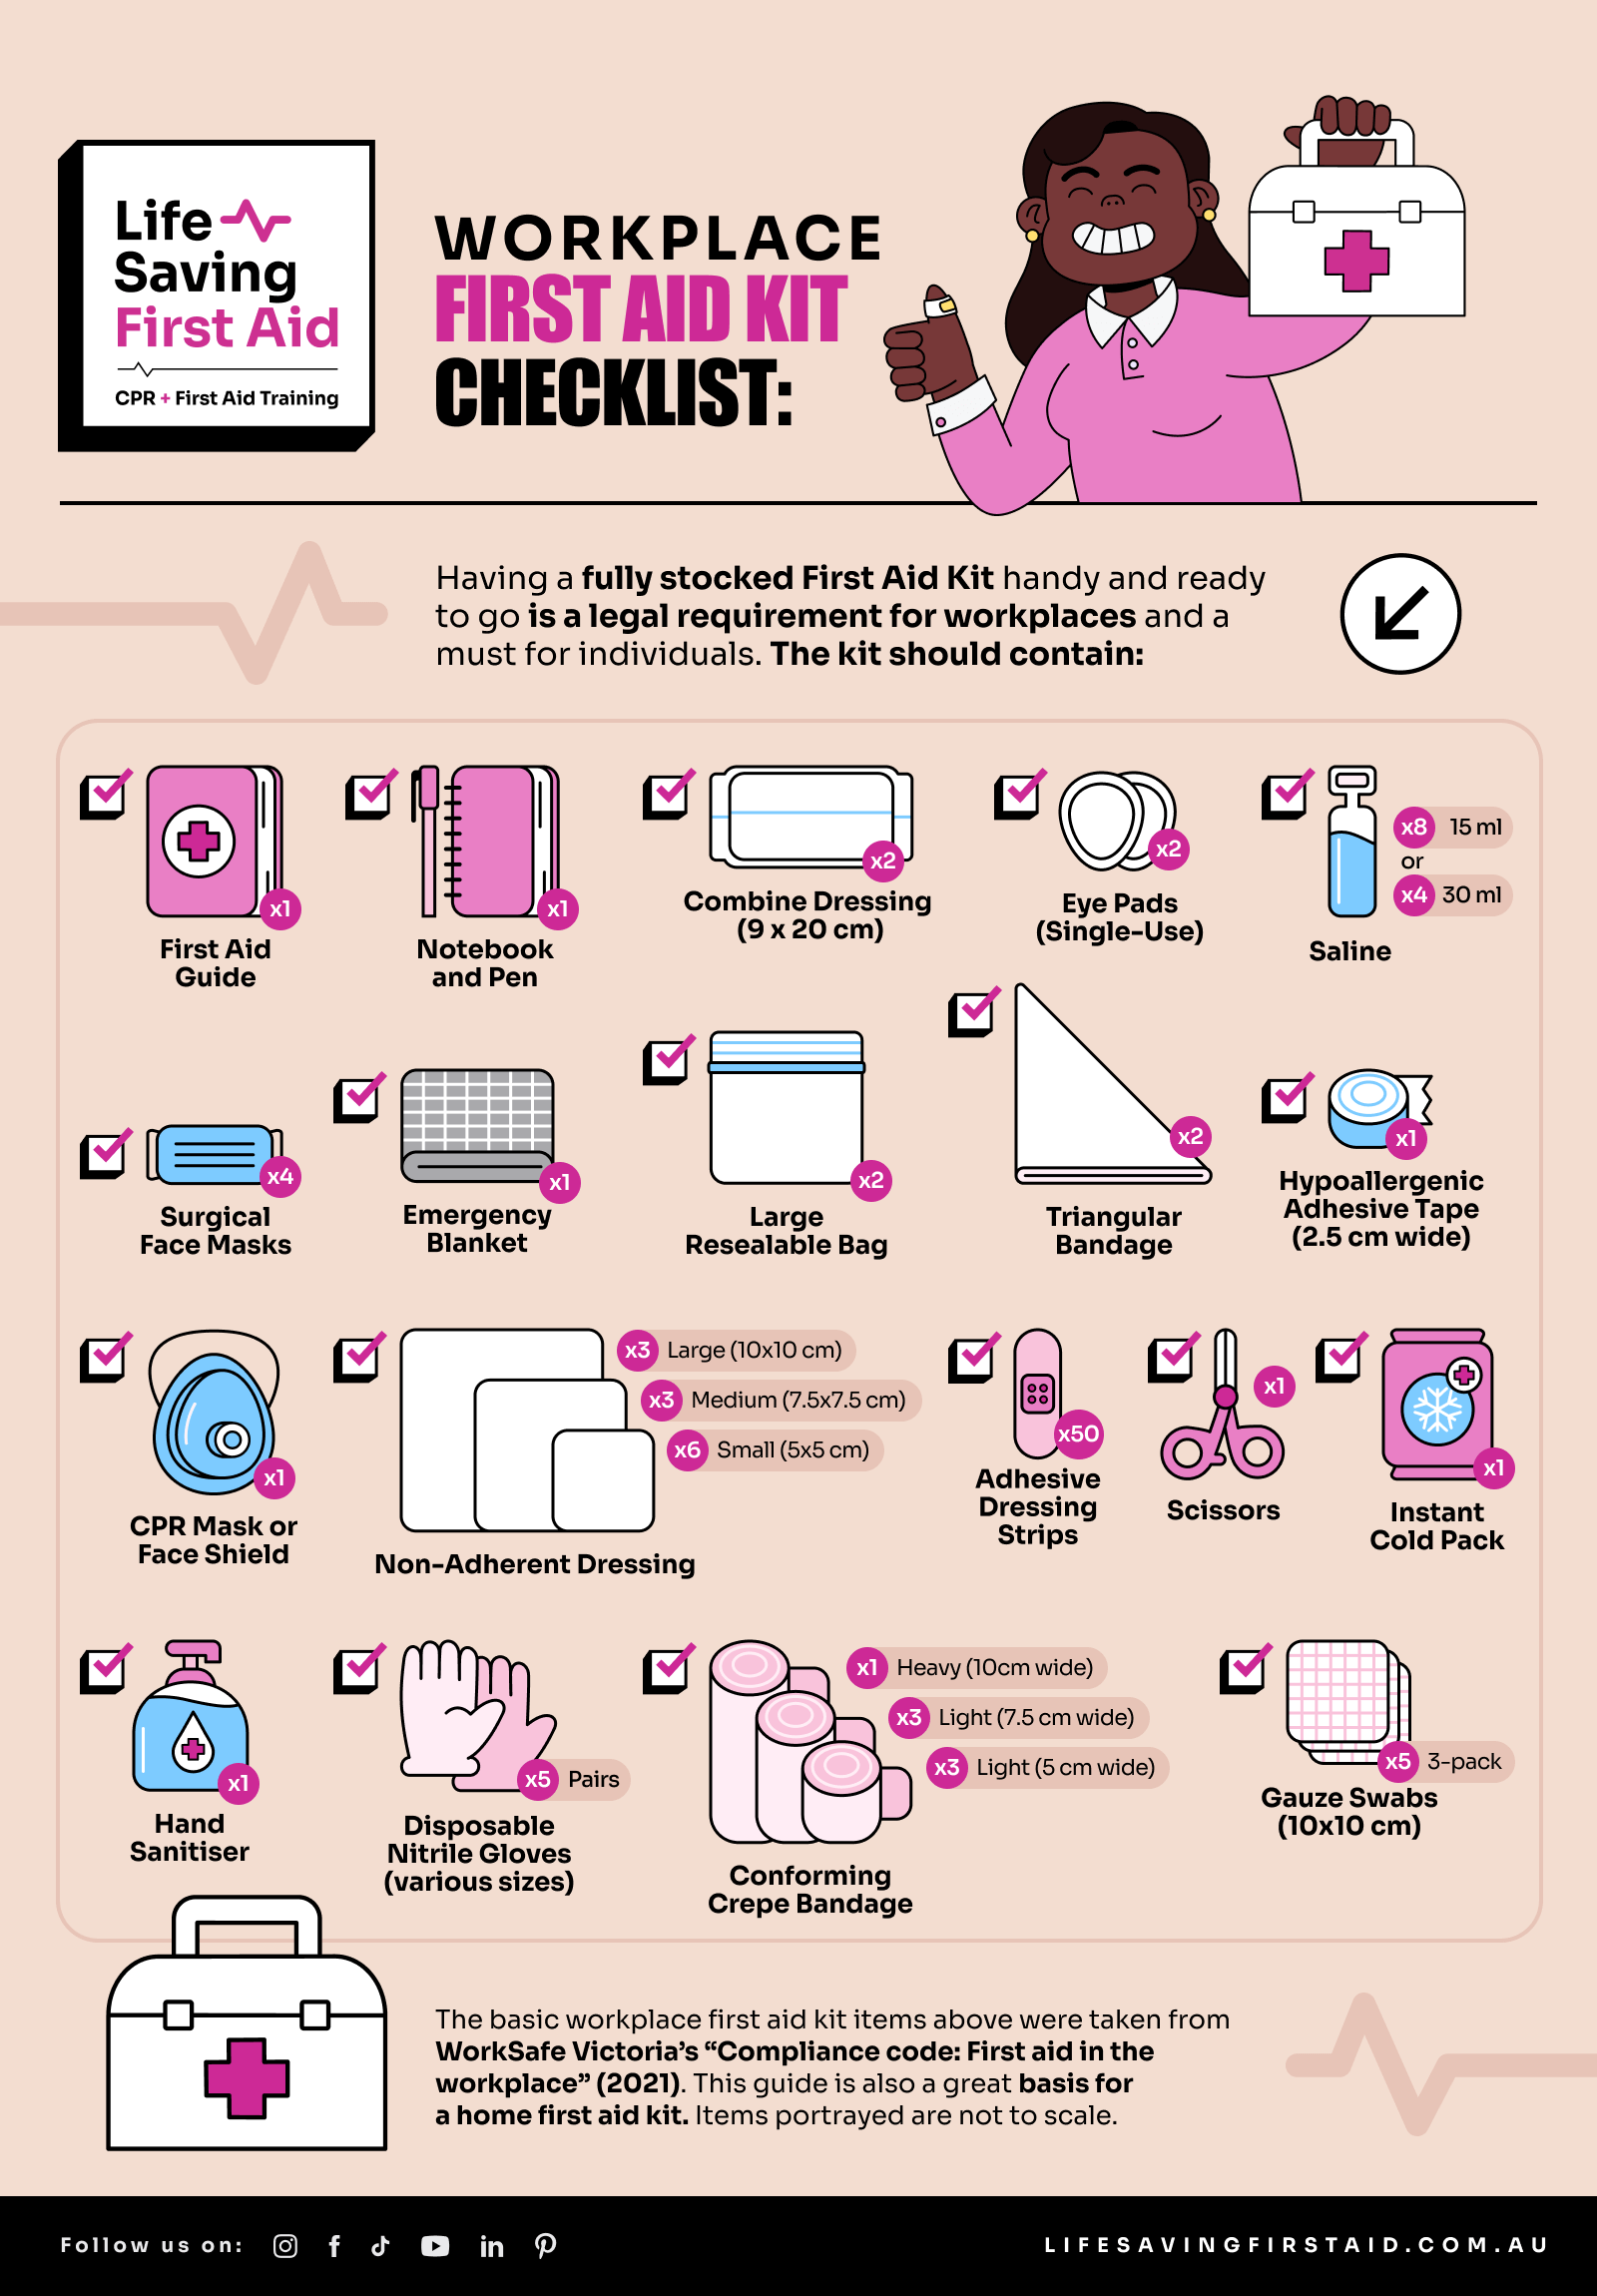
First Aid Instructions/quick reference guide (x1)
Notebook and Pen or Pencil (x1)
Disposable surgical face masks (x4)
Resuscitation face mask or face shield with one-way valve (x1)
Disposable nitrile gloves – nitrile is a latex-free rubber suitable for people with latex allergies (x5 pairs in various sizes)
Gauze swabs – sterile 3-pack of 10 x 10 cm (x5 packs)
Saline (x8 of 15ml or x4 of 30 ml)
Adhesive dressing strips – plastic or fabric (x1 packet of 50)
Non-adherent wound dressing/pad – Small 5 x 5 cm (x6)
Non-adherent wound dressing/pad – Medium 7.5 x 7.5 cm (x3)
Non-adherent wound dressing/pad – Large 10 x 10 cm (x3)
Conforming crepe bandage– Light 5 cm width (x3)
Conforming crepe bandage– Light 7.5 cm width (x3)
Conforming crepe bandage 10 cm width (x1)
Scissors (x1)
Adhesive Tape – non-stretch hypoallergenic 2.5 cm wide roll (x1)
Dressing Combine Pad 9 x 20 cm (x2)
Large Resealable Bag (x2)
Triangular Bandage minimum width 110 x 155 cm (x2)
Single-use eye pads (x2)
Instant cold pack for treatment of soft tissue injuries and some stings (x1)
Alcohol-based hand sanitiser (x1)
Emergency accident blanket (x1)
With these items ticked off your first aid kit checklist, you’ll be able to easily tackle cuts, scrapes, sprains, and muscle aches.
Whether you’re at home, on the go, or out exploring, these essentials will be there to lend a helping hand. So, remember to pack them before you head out!
Customising your First Aid Kit
So, you’ve got the essentials covered, but what if you want to tailor your first aid kit to your specific needs?
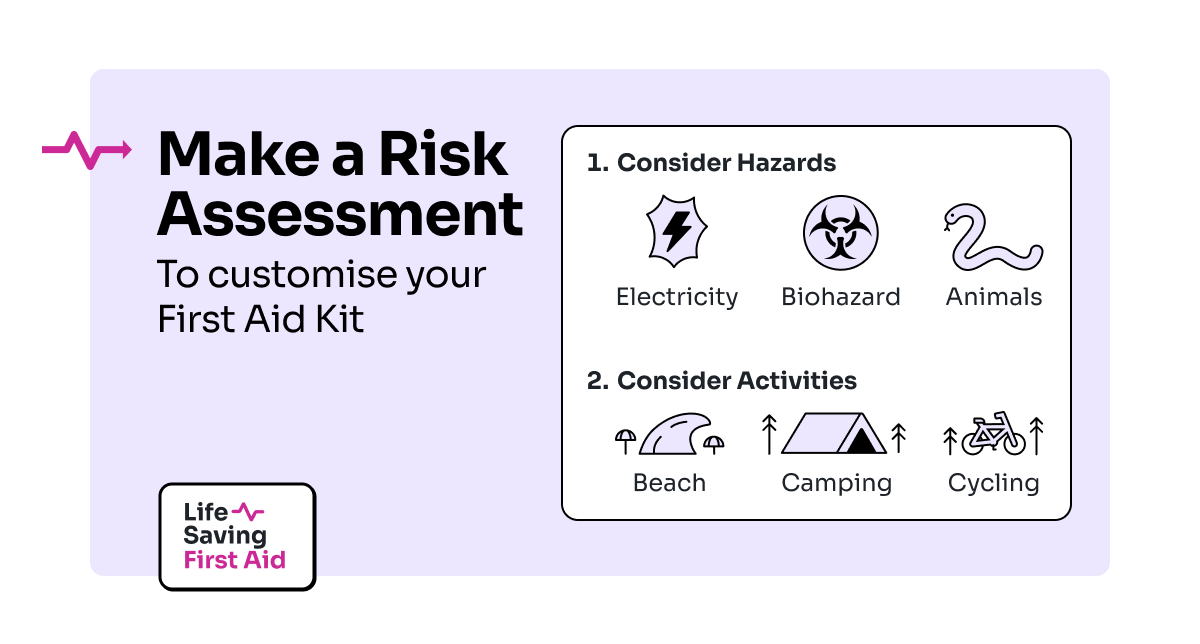
The contents of your first aid kit should be determined by a basic risk assessment.
First and foremost, think of the hazards you will likely face and add the appropriate items to your first aid kit. Here are some examples:
The possibilities are endless, so put your thinking cap on and get creative!
And lastly, don’t forget to periodically check and restock your kit. The items in your first aid kit have expiry dates and need to be replaced so it’s always ready when needed.
Planning and preparation now can go a long way if you find yourself in a pinch. So, go ahead and make that first aid kit your own!
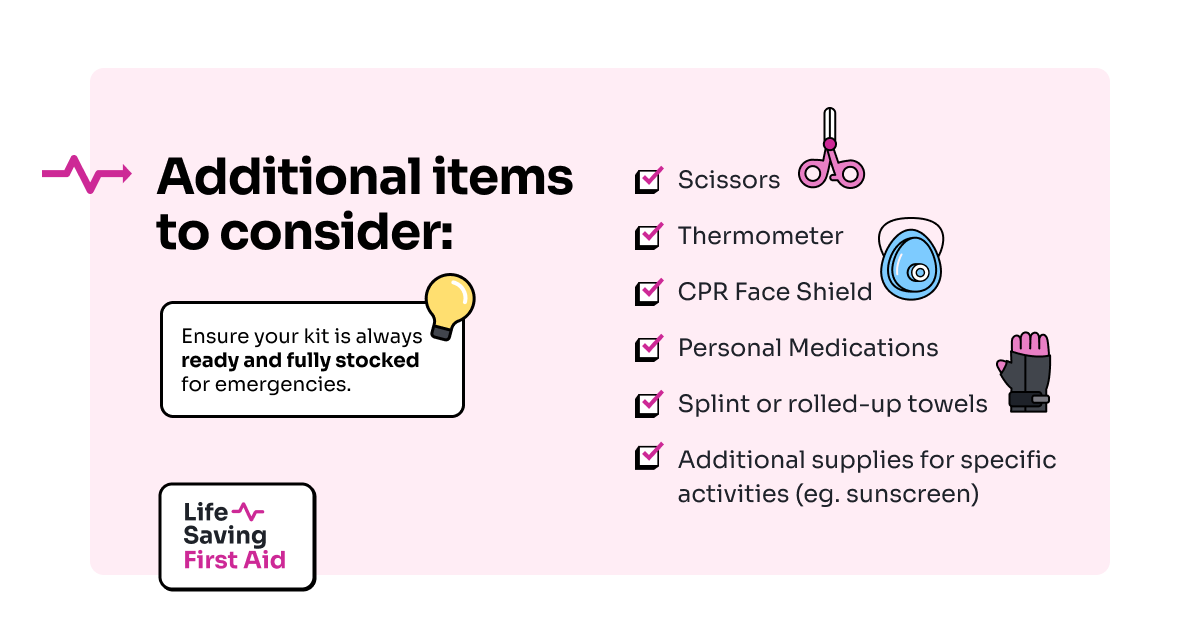
Additional First Aid Kit items to consider
And let’s remember those extra little items that can make all the difference in a first aid emergency.
Scissors: Scissors can come in handy to cut gauze or tape.
Thermometer: Keep an eye on any fever and ensure it’s under control.
Splint or rolled-up towels: Immobilize a sprain or break and keep it steady.
CPR face shield: Be prepared for an emergency and potentially save a life.
Personal medications: Remember to pack any chronic condition medications such as asthma medication or an anaphylaxis autoinjector such as EpiPen.
Additional supplies for specific activities: Tailor your kit to your needs, whether sunscreen for a beach trip or extra bandages for a camping trip.
Regular check and restocking: Ensure your kit is always ready and fully stocked for emergencies.
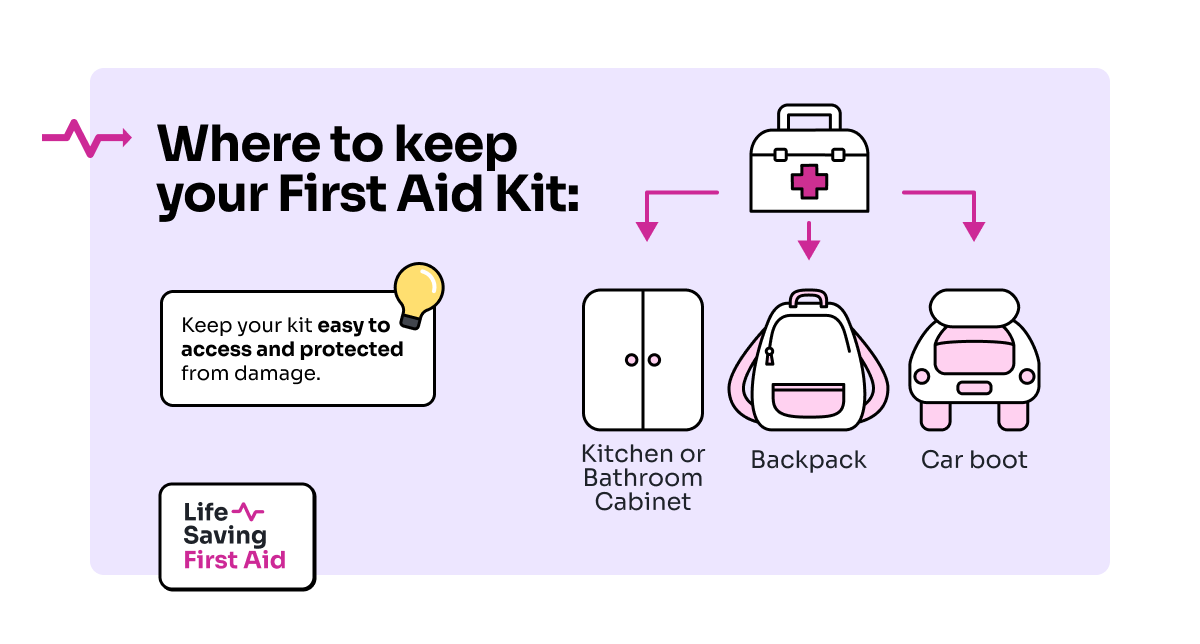
Where to Keep your First Aid Kit
Now that you’ve set up your ultimate first aid kit, it’s time to think about where to keep it. You want it to be easily accessible in an emergency and secure and protected from damage or theft.
A handy spot in the car boot is excellent for road trips, or you can tuck it away in a backpack for outdoor adventures.
At home, a kitchen cabinet or bathroom cupboard works wonders. Just make sure everyone in your household knows where it is so they can grab it in a pinch.
And if you’re on the go, don’t be afraid to get creative! Toss it in a nappy bag or keep it in your backpack for peace of mind.
No matter where you are or what you’re doing, it’s always a good idea to have a first aid kit on hand. And with so many options out there, it’s easy to find one that fits your specific needs.
At home, a compact and comprehensive first aid kit is perfect for those everyday mishaps. In your car, you want something portable and easy to grab in case of an emergency on the road. And for outdoor excursions, a rugged and waterproof first aid kit is essential for those unexpected adventures.
The most important thing is to have it within reach, so you’re ready for anything life may throw your way.
Conclusion
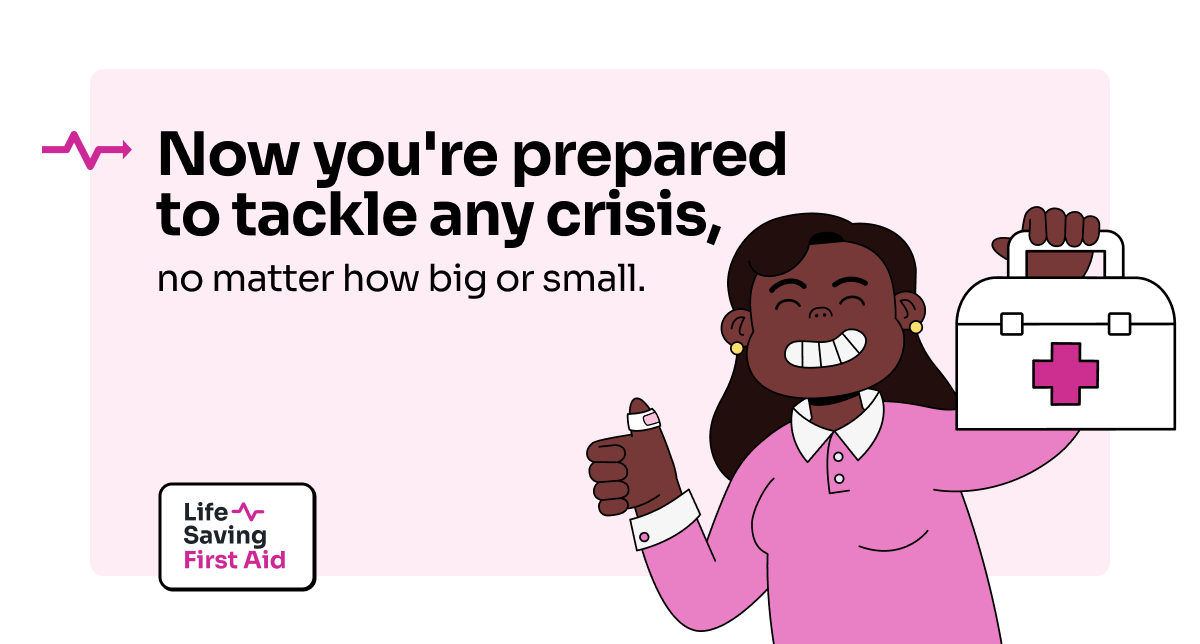
Having a first aid kit on hand can, in an emergency, be the difference between life and death.
You can quickly spring into action by keeping your first aid kit nearby and easily accessible.
Remember to maintain the fundamentals and modify your gear according to your unique demands, for use in your home, vehicle, or outdoors. When you have a fully stocked, ready-to-go first aid kit, you can relax, knowing that you’re prepared to tackle any crisis, no matter how big or small.
Start assembling your ideal first aid kit right now. Don’t wait until it’s too late!
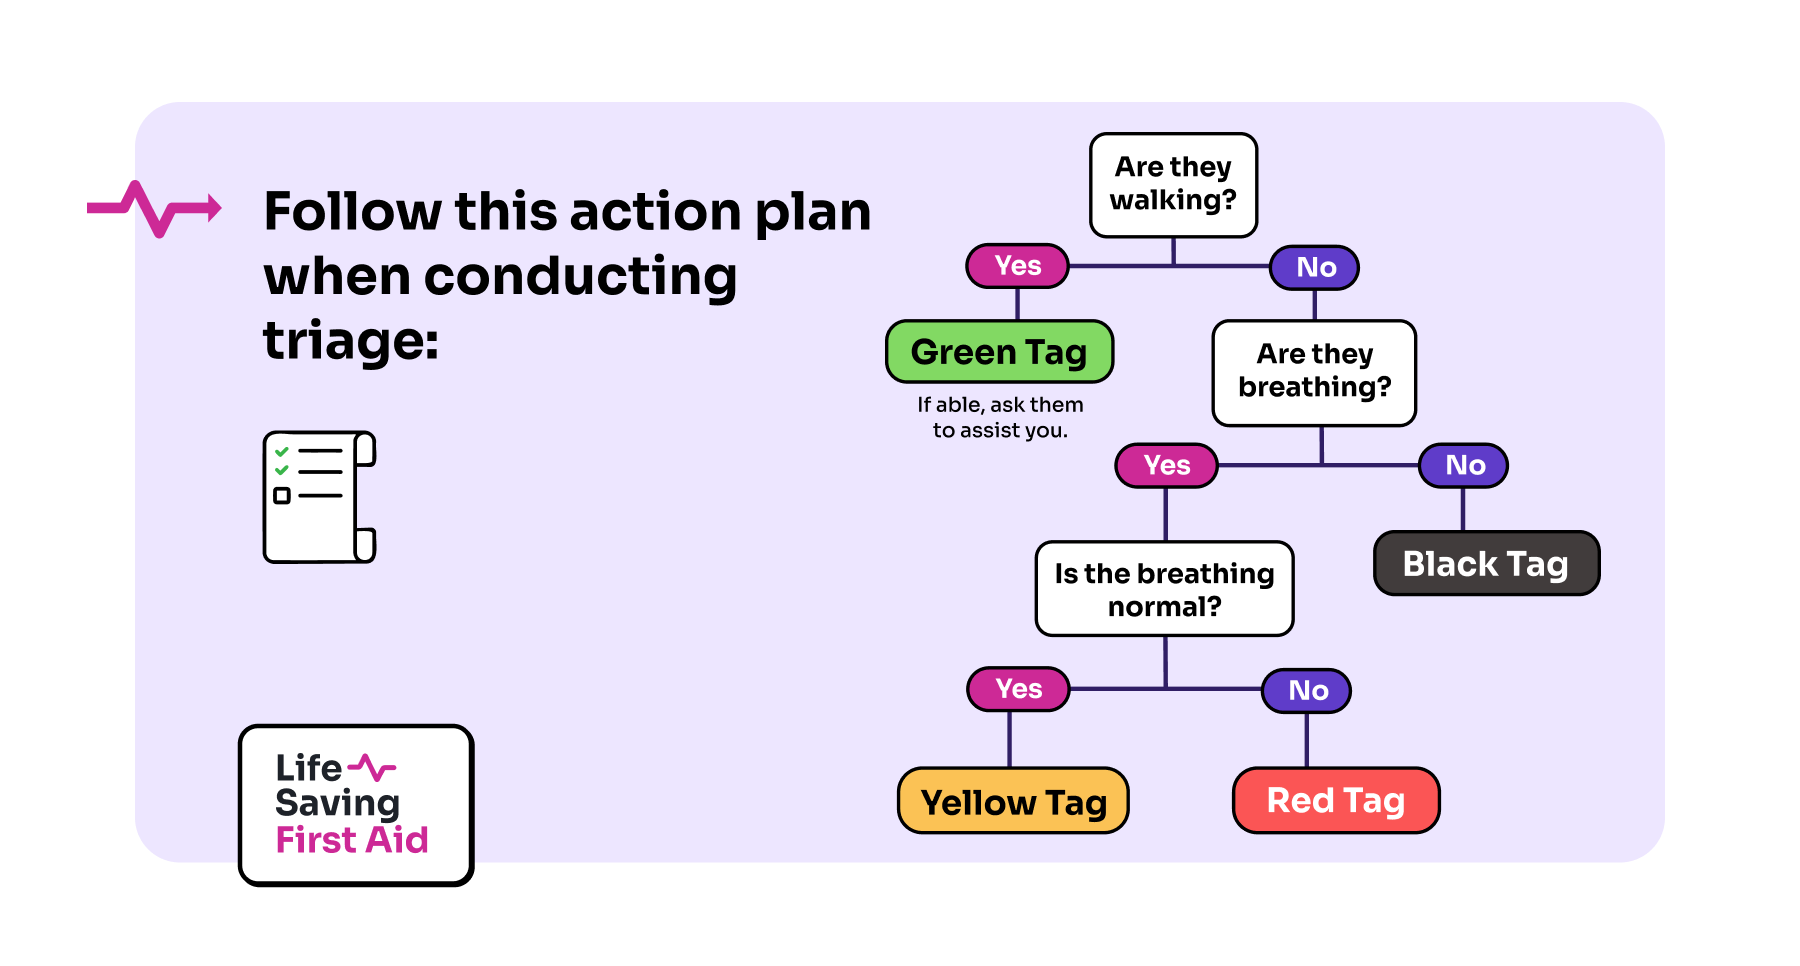
When faced with multiple casualties the process you should follow is called Triage.
Safety Firstfor Triage
Even if you are faced with a multiple casualty triage situation, your starting point is always DRSABCD and first on the list is Danger.
Conduct a rapid risk assessment for your safety and the safety of those around you. Check for hazards – Physical, Chemical, Biological, Electrical, Mechanical and Psychological and try to minimise the risks.
Body fluids from the casualty present a biological hazard. The risk, you could become infected. Minimise the risk by wearing PPE – Gloves, eyewear, mask etc. Or, if traffic is the hazard, being hit by a car is the risk. Therefore, move to a safer location, put up warning signs or have someone direct and control the traffic to minimise this risk.
Your hazard and risk assessment may even lead you to the conclusion that for your own safety you need to leave the area and contact a specialist emergency service to make the area safe before you can help the casualty.
Your safety is the priority.
What is Triage?
If there are multiple casualties, CALL 000, then you will need to undertake basic triage. Check out this link for more info on 000 calls.
There are also some apps available which can assist. You can find them here.
Basic triage is the sorting of multiple casualties by the severity of their injury or illness – from those in most need of assistance to those who require little or no assistance – using these categories:
Red Tag
Immediate – use a red tag
Casualties that belong to this category have life-threatening but treatable injuries. Anyone assigned with a red tag requires immediate medical attention. They are also the first to be transported to the hospital when medical help arrives.
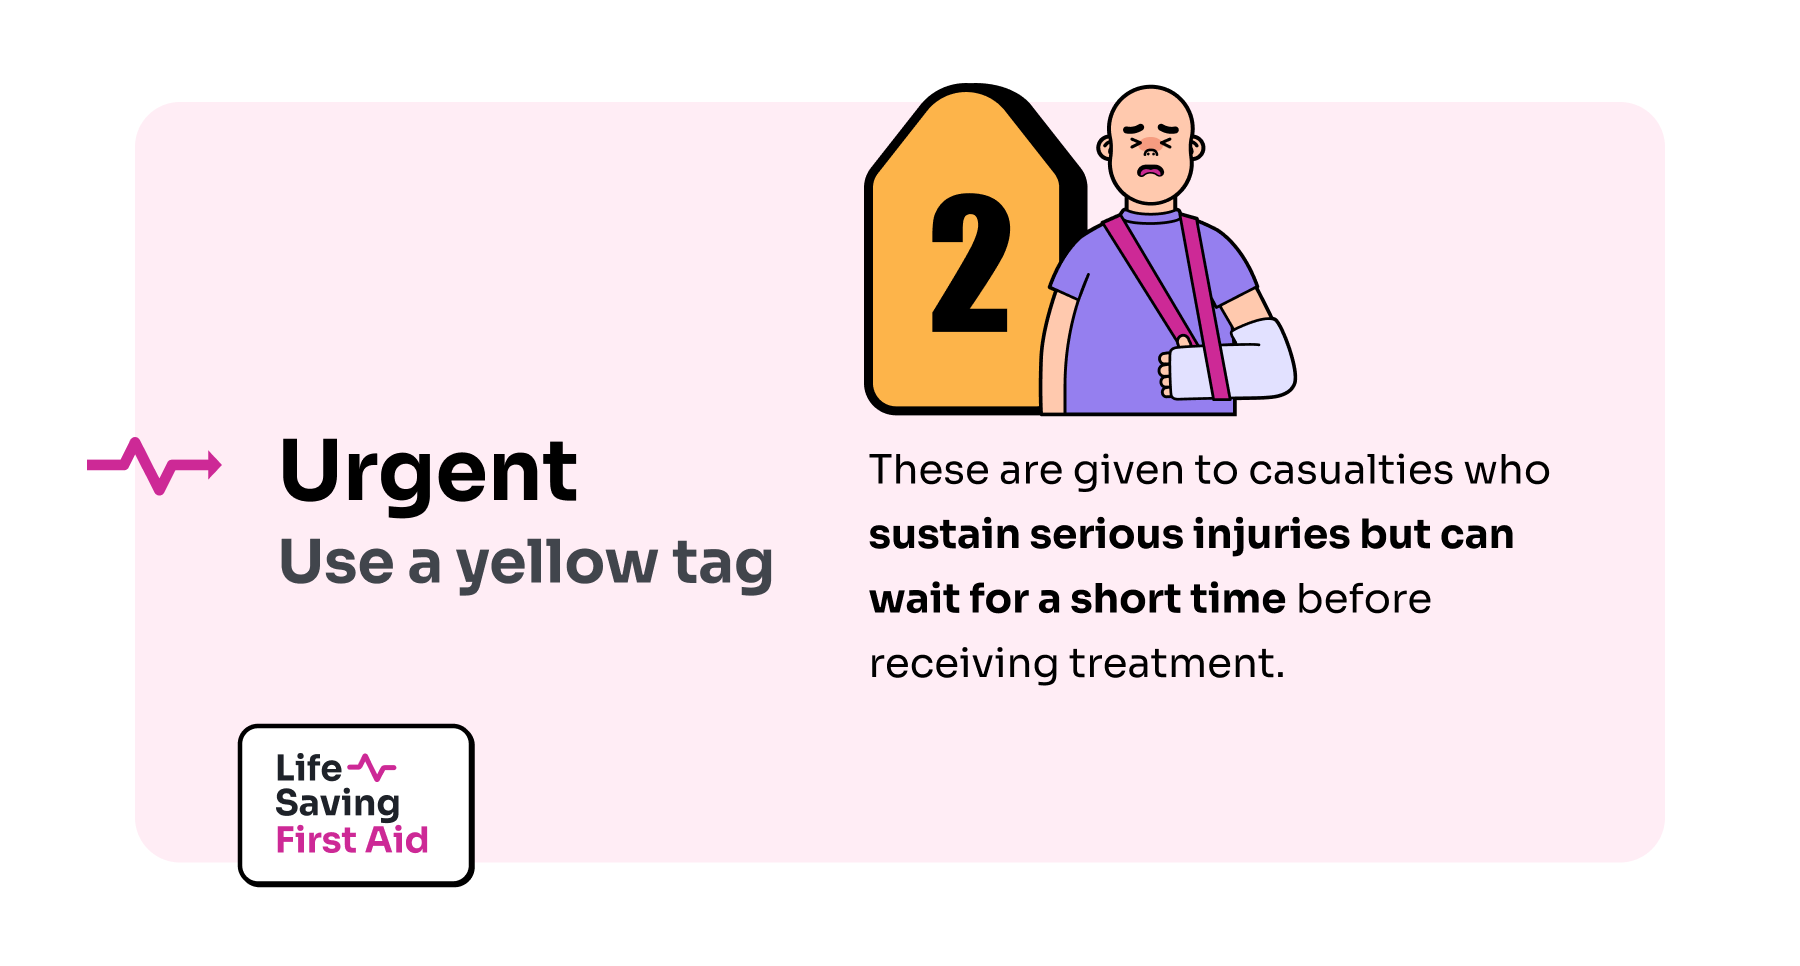
Yellow Tag
Urgent – use a yellow tag
These are casualties who sustain serious injuries but can wait for a short time before receiving treatment.
Green Tag
Delayed – use a green tag
Green tag casualties can wait hours to days before treatment. These ‘minor casualties’ are usually separated from the more serious injury by asking them to move to a specific area OR you can ask them to give you some assistance if they are able.
Black Tag
Deceased – use a black tag
The final group in which they categorize as the deceased group or white group. Unfortunately, these are casualties you cannot help, and they cannot be resuscitated.
Conducting Triage
While conducting triage it is important that you only commit to treating someone with catastrophic bleeding. For example a severed limb. Try and stop the bleeding then move on.
OR If a casualty is unconscious but breathing, place them in the recovery position and move on.
As a rule of thumb, you can follow this action plan when conducting triage:
Stop catastrophic bleeding. Place in recovery position if appropriate.
Are they walking? YES –then GREEN TAG DELAYED. You can get them to assist you if they are able. Are they walking? NO – check their breathing.
Are they breathing? NO – then BLACK TAG DECEASED
Are they breathing? YES. Is it normal? YES – then YELLOW TAG URGENT
NOT normal breathing – RED TAG IMMEDIATE
Remember that triage is an ongoing process, so when you have categorised the injured you need to start again. Some of the Urgent may become Immediate, Immediate to the Deceased and even some in the Delayed may need to be reclassified as well.
When you have completed the Triage process, you need to start again. Why? Because the condition of the casualties can change. Some Yellows may become Red, some Reds may become Blacks and so on. Continual reassessment contributes to effective Triage.
Handover to Ambulance
You have already called 000 so when the ambulance arrives you will need to conduct a handover/takeover with the ambulance officer or paramedic.
The details of the incident, as you understand them, the numbers involved, the actions you have taken so far, any relevant timings and the injuries of the casualties can now be relayed to the attending emergency services. Be as clear and concise as you can. State only the facts. There is no need to embellish or add your thoughts unless asked.
Taking control
Don’t panic! If you are first on the scene initially, or the only first aider, you will need to take control. You may need to delegate tasks to others. Locating an AED, CALLING 000 dealing with walking wounded and assisting with CPR. keeping notes etc.
You will need to lead and direct with confidence, making good decisions, acting quickly and in the best interest of your casualty or casualties. Remain calm and focused on the task at hand. You may have to adapt quickly as the situation changes and communicate effectively to others involved. Remember to keep within your own skill level.
Good judgement is essential in directing others such as bystanders, other first aiders, or other resources on the scene to assist as needed.
Main points
Lets’ recap the main points:
• Make sure the area is safe and use PPE
• Use DRSABCD
• Triage the casualties if more than one
• Conduct a secondary assessment
• Be aware of post-incident stress and seek professional help
In this article, we are going to look at some of the policies, procedures, guidelines, and legal aspects of First Aid. This includes things like Duty of Care, ARC Guidelines, consent, and other relevant policies and regulations.
It is important to know about these because they offer you protection from legal action if, and when, you provide First Aid.
And that’s a good thing, right?
What is First Aid?
First Aid is the initial care you can give to a person who is injured or has fallen ill until an ambulance or other help arrives. Therefore, knowledge of First Aid is important for everyday activities and of course in the workplace.
Some of you may become responsible for the provision of First Aid in your workplace. All of you may have to provide First Aid to someone in the community.
To be effective and safe when providing First Aid to someone, you should be aware of these policies and procedures.
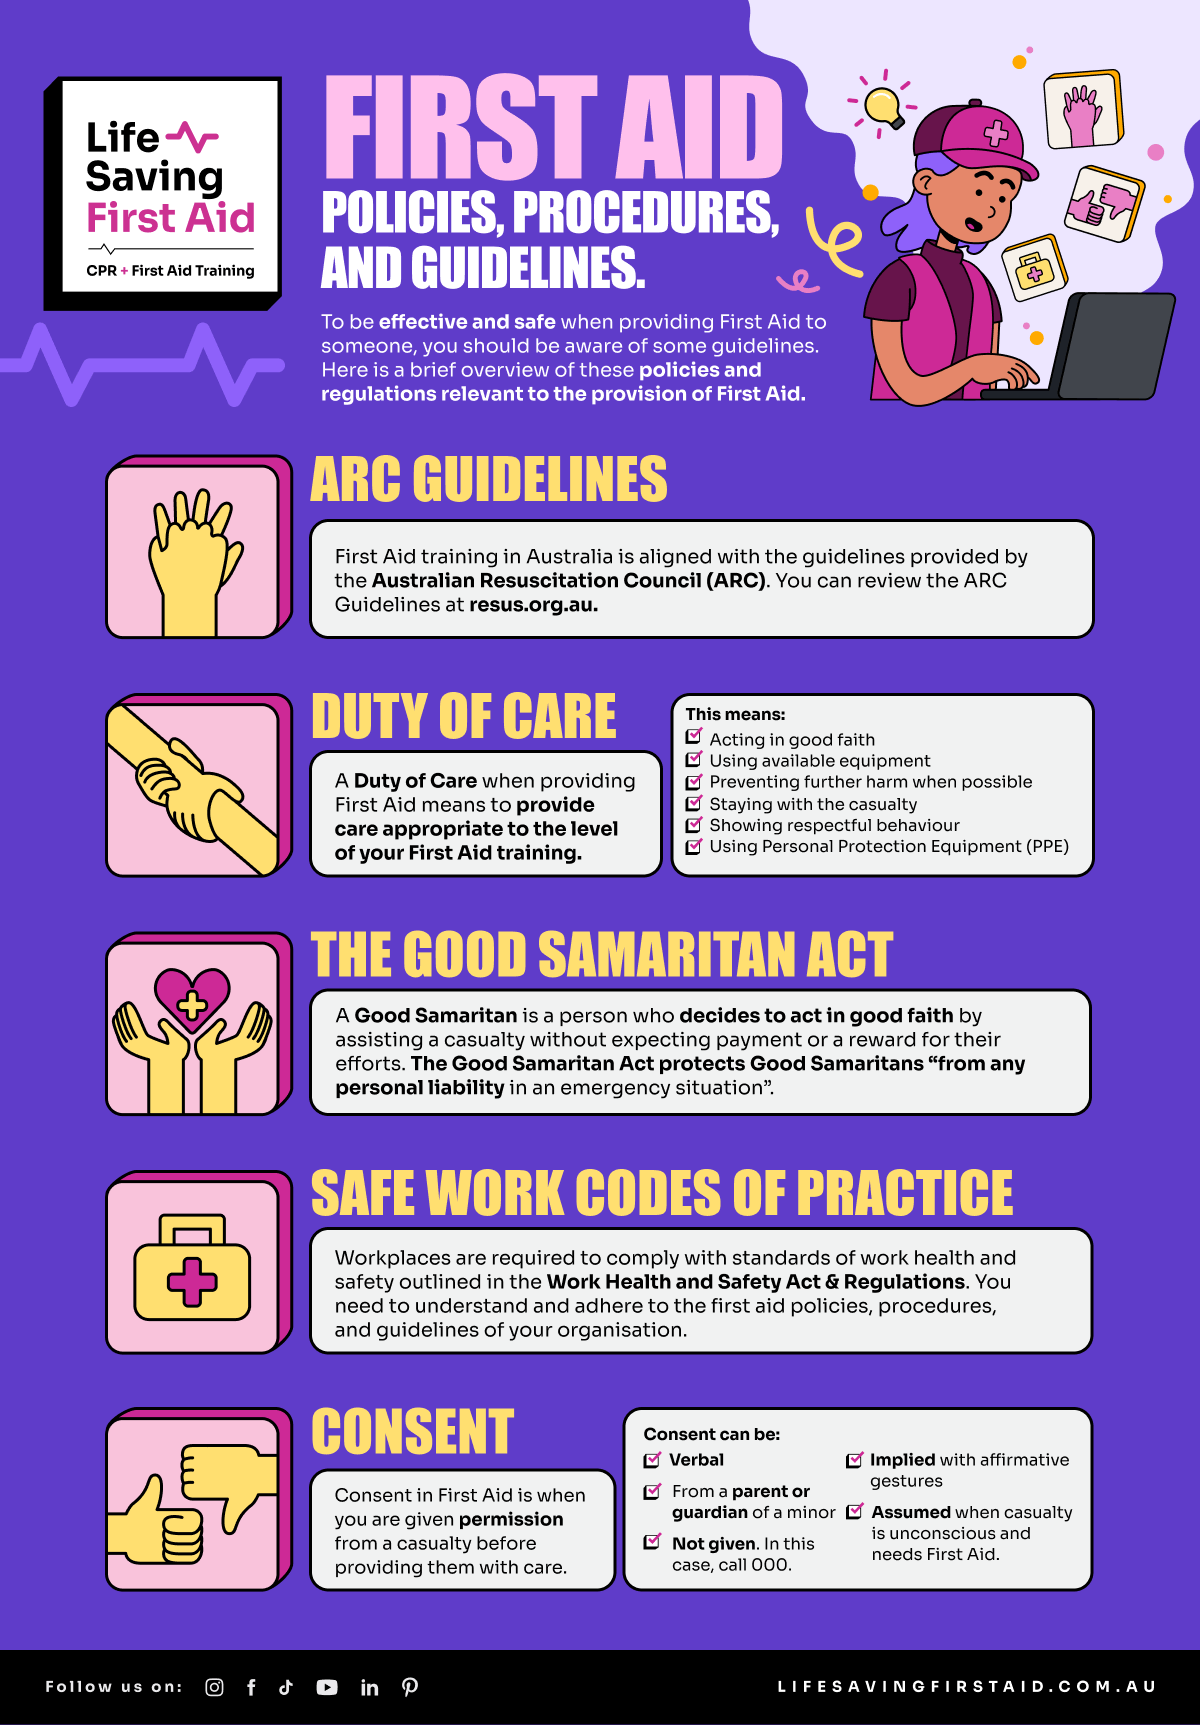
ARC Guidelines
First Aid training in Australia is aligned with the guidelines provided by the Australian Resuscitation Council (ARC).
According to the ARC, “the ARC Guidelines shall be resource documents for individuals and organisations that teach and practise resuscitation…”.
This provides a standard starting point for First Aid training providers, and all the training material at Life Saving First Aid is based on the ARC Guidelines. You can review the ARC Guidelines here.
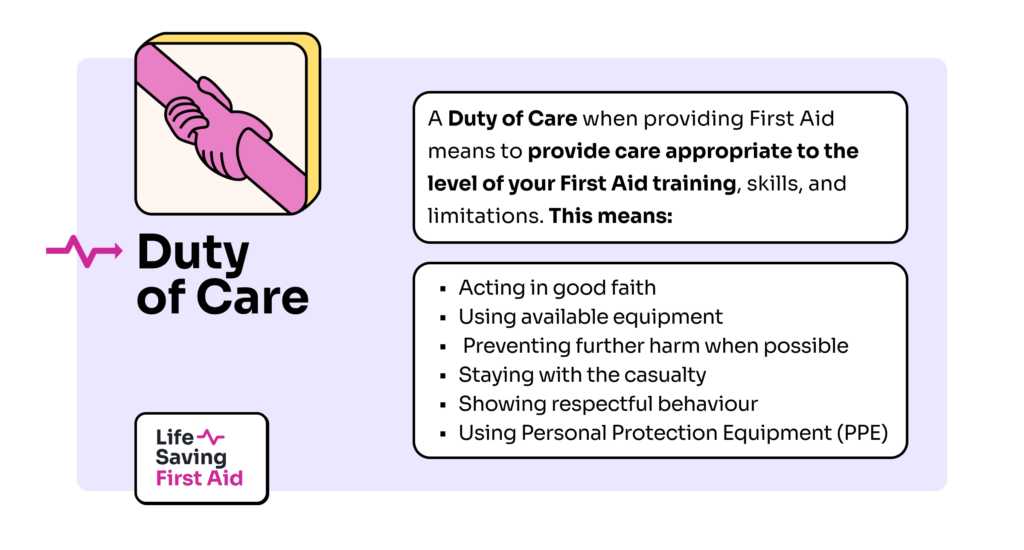
Duty Of Care
As a First Aider or general member of the public, you are not legally required to help or aid another person.
However, If you do decide to provide First Aid to someone in the community, then, as a First Aider, you have a Duty of Care.
A Duty of Care when providing First Aid means to provide care to an injured or ill person appropriate to the level of your First Aid training, skills, and limitations. This means acting in good faith, with reasonable care, and using available equipment and resources according to the manufacturer’s instructions.
If you can, you should try to prevent further harm to the casualty. Stay with them until the ambulance or medical personnel arrive.
By staying with them, you can monitor their condition and respond to any changes in their condition or the environment.
Conscious or unconscious, adult or child, you have a Duty of Care to show respectful behaviour towards the casualty regarding beliefs, culture and who they are as a person. Also, to be kind and reassuring, providing comfort, dignity, and, wherever possible, privacy.
You have a Duty of Care to yourself as well. It is important for your safety and the protection of your casualty that you use Personal Protection Equipment (PPE) when you are providing First Aid. PPE is things like Gloves, Face Shields, Eye protection etc.
Speaking of protection, let’s have a look at the Good Samaritan Act/Law.
The Good Samaritan Act
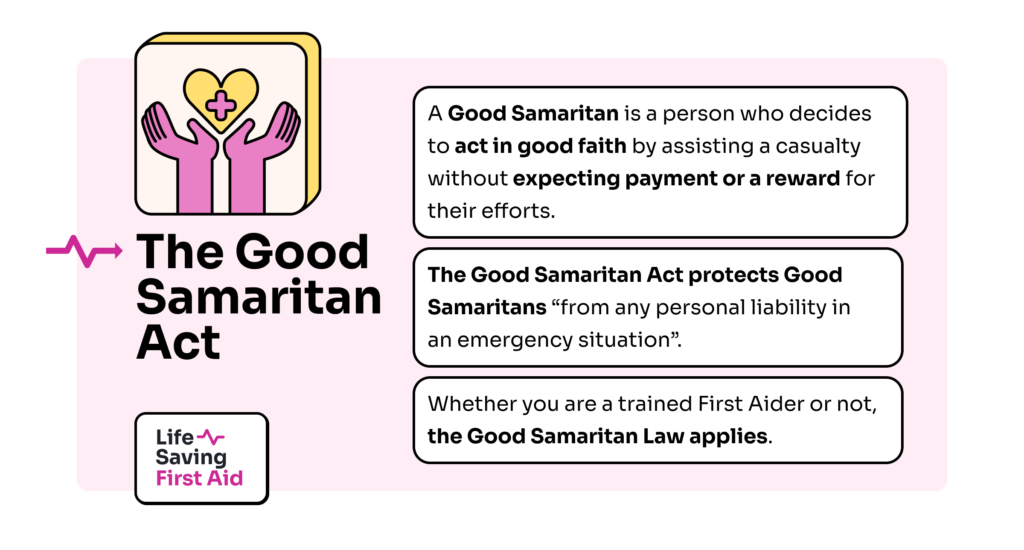
Included in First Aid Policies, Procedures and Guidelines is the definition of a Good Samaritan.
According to the Australian Civil Liability Act, “A Good Samaritan is a person who decides to act in good faith by assisting a person who is injured or at risk of being injured and not expecting payment or a reward for their efforts.”
A person who is acting in good faith in providing assistance to someone in need is protected from any personal liability in an emergency situation under the Good Samaritan laws.
Whether you are a trained First Aider or not, the Good Samaritan Law applies.
Remember, as a First Aider you must provide care to an injured or ill person appropriate to the level of your First Aid training, skills, and limitations. You should also act in their best interests.
At the time of writing this, no First Aider in Australia has faced a lawsuit and lost for providing first aid within their level of training.
Safe Work Codes of Practice
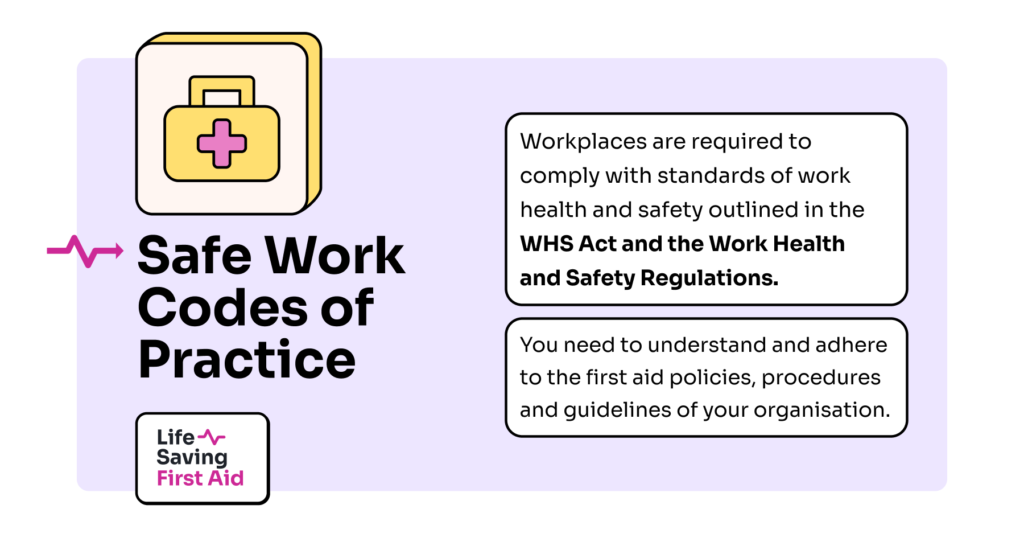
If you are a designated workplace First Aider, these are the important policies, procedures and guidelines you need to know about: The Work Health and Safety Act Codes of Practice for First Aid, and your Duty of Care.
Codes of practice for First Aid provide practical guidance on how to achieve the standards of work health and safety required under the WHS Act and the Work Health and Safety Regulations (the WHS Regulations), and effective ways to identify and manage risks. Read our article for more about risk assessment.
You will find the Codes of Practice on the Safe Work Australia website. They advise on how many First Aid kits your workplace requires, what the First Aid Kits should contain, First Aid training required, maintaining current certificates, and so on.
For example, Appendix E of the Codes of Practice for First Aid is a list of the First Aid equipment you need to have in your workplace First Aid kit.
Next time you go to work, find your First Aid kit and check it out.
Familiarise yourself with its location and what it contains. Go to the Codes of Practice Appendix E, see if your First Aid Kit complies with the list of items that should be in it. If it doesn’t, make a list of the missing items and get your manager or supervisor to organise replacements.
Included in this list, of course, are items of Personal Protection Equipment (PPE).
During an incident, you should wear PPE such as gloves, face shields, and safety glasses. You also should wash and sanitize your hands following an incident.
First Aid in the Workplace
As a workplace first aider, you have a Duty of Care to take the appropriate action and provide First Aid treatment to anyone who is ill or injured in your workplace, to the best of your ability. This includes employees and/or visitors.
Your workplace should develop policies and procedures for first aid taking into account these legislations, regulations, and codes of practice. In the workplace, a first aider must know where these are located. They provide information for you regarding emergency plans, first aid, and reporting incidents.
You will need to understand and adhere to the first aid policies, procedures and guidelines of your organisation.
After an incident, you will be required to complete a report of the incident and undertake a debrief.
Consentfor First Aid
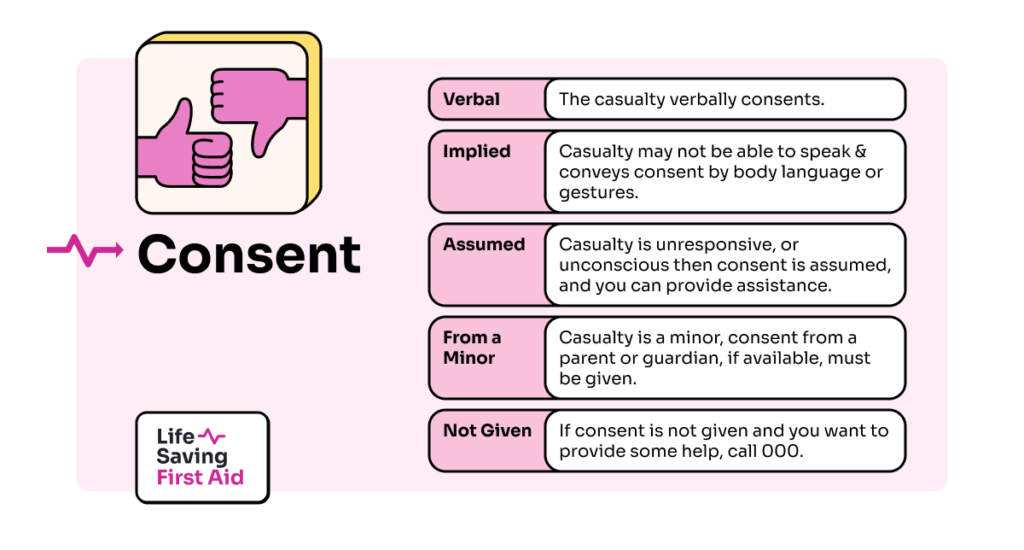
Remember, it is a legal requirement that you obtain consent from an injured or ill person, regardless of their age, ability, health, or mental status, before you assist them with First Aid.
In line with the policies, consent can be VERBAL, IMPLIED, or ASSUMED.
Verbal
This simply means that the casualty verbally consents. For example, if your casualty has a broken arm and they reply “Yes” when you asked, “ Can I help you? I’m trained in First Aid”, there is your consent.
Implied
Where a casualty may not be able to speak and conveys consent by body language or gestures. For instance, if your casualty was choking and unable to speak, and they nodded or physically indicated “Yes” when you asked, “Can I help you? I’m trained in First Aid,” this would imply consent.
That’s consent.
Assumed
It’s pretty obvious that if someone is unconscious, we can’t ask for their consent before we assist them with first aid. But don’t panic, the law has you covered. For first aid you can assume your unconscious casualty has given their consent.
Consent from a minor
The parent or guardian must give their consent if the casualty is a minor.
For emergency treatment or assisting with a wound or illness, a mature minor could give consent.
If they cannot give consent and there is no parent present, the doctrine of necessity would justify treatment that is reasonably necessary and in the child’s best interests.
Consent not given
You want to help someone. If they do not give consent, call 000. Tell the operator what is happening and let them make a decision. They may send an ambulance to assist.
First Aid Certificate currency
So that you can renew your certificate before it expires, know the expiry date.
Your CPR Certificate will expire after 12 months, and your First Aid certificate after 3 years from the issue date. You can find more info about Certificates in our blog article “How long does a First Aid certificate last?“.
Conclusion
So, just to Recap:
First Aid policies, procedures and guidelines include: The ARC guidelines relevant to the provision of first aid, first aid guidelines from Australian national peak clinical bodies and Worksafe Codes of Practice.
To apply the First Aid code of practice, your duty of care and privacy policy and the protection of the Good Samaritan Laws.
Remember to use PPE, including resuscitation barrier devices, to protect yourself, and get consent where possible.
And, don’t forget there may be a potential need for stress management techniques and support following an incident